
vMix live streaming software that transforms a standard Windows PC into a professional video production studio. It enables users to mix video and audio sources, creating productions that can be recorded, streamed, and integrated into various video production workflows.
With support for standard definition (SD), high definition (HD), and even 4K outputs, vMix offers flexibility for diverse live streaming production needs. The software requires a PC running Windows 10 and a DirectX10 compatible graphics card, with detailed system requirements available on the vMix website. The user interface is designed to mimic a professional broadcast studio, featuring side-by-side preview and output windows, which, while initially complex, quickly become intuitive and powerful.
Table of Contents:
- vMix Live Streaming Features
- vMix Live Streaming Production
- vMix for Windows: Compatibility and Setup
- vMix for Mac
- Getting Started with vMix Studio live streaming
- Steps needed to begin streaming to the web with vMix
- vMix 29 (2025): Major Performance & Workflow Upgrades
- vMix vs OBS vs Wirecast: which is better for live streaming?
- vMix Live Streaming Software Pricing
- Common vMix Issues & Fixes
- FAQs
vMix stands out in the crowded field of video production software by offering a balanced mix of features and affordability. Its unique pricing strategy caters to users with varying budgets and needs, with five editions: Basic, Basic HD, HD, 4K, and Pro, ranging from free to $1200.
Even the entry-level editions include core features like HD resolution, multiple camera inputs, overlays, built-in animated titles, scoreboards, and tickers. All versions support recording and streaming up to three simultaneous live streams.
One of the standout features of vMix is its scalability, allowing new users to start with a basic license and easily upgrade as their needs grow without learning a new software environment. This scalability makes vMix an ideal choice for many users, ensuring a smooth learning curve and consistent performance without the need to switch to different software due to technical limitations.
vMix Live Streaming Features
Inputs and Compatibility
- Video Cameras: Supports 4K, HD, and SD cameras, including webcams and capture cards.
- NDI®: Allows high-quality, low-latency video and audio transfer over a local network between vMix systems and other NDI-compatible sources.
- Video Files: Compatible with popular formats like AVI, MP4, H264, MPEG-2, WMV, MOV, and MXF.
- DVDs: Supports DVDs with menu navigation.
- Audio Files: Works with MP3 and WAV files.
- Audio Devices: Can mix multiple audio sources, including sound cards and ASIO audio interfaces.
- Playlists: Combine multiple video and/or audio files into a single input.
- Instant Replay: Offers slow-motion replay for up to 8 cameras.
- Video Calls: Supports live remote video calls for up to 8 guests, with direct Zoom integration.
- Other Inputs: Includes web browser, RTSP, PowerPoint, photos, solid color backgrounds, and more.
Streaming, Recording, and Output
- Simultaneous Streaming and Recording: Stream to platforms like Facebook Live, YouTube, and Twitch while recording in full HD.
- Output Options: Compatible with AJA, Blackmagic, and Bluefish cards for professional recording decks and monitors.
- Virtual Camera: Stream to third-party software like Skype, Zoom, Teams, and VLC.
Explore More ✅
With VdoCipher, stream live content in HD and offer your viewers the ability to choose their quality level. Embed the player seamlessly into your platform and redefine the live streaming experience.
Transition Effects
- 13 Transition Effects: Includes cut, fade, zoom, wipe, slide, and more, with customizable transition buttons and up to 4 custom stinger transitions.
Efficiency and Performance
- Efficient HD Production: Utilizes full 3D acceleration for efficient live production, optimized for NVIDIA hardware encoding for enhanced performance.
Built-In Animated Titles
- Title Templates: Over 100 built-in animated titles, scoreboards, and tickers.
- GT Designer: Create custom static and animated titles, with advanced features in higher editions.
Desktop Capture
- PC and Mac Sources: Capture screens from remote desktops and local displays, with audio capture support.
Remote Guests
- vMix Call: Easily add up to 8 remote guests with a browser and webcam.
- Zoom Integration: Integrate Zoom meetings directly, supporting up to 1080p HD.
vMix Live Streaming Production
Below explained are the key steps in creating live productions using vMix software, emphasizing its versatility and comprehensive functionality.
Cameras – vMix supports a wide array of camera inputs, including cinema cameras, handy cams, camcorders, PTZ cameras, IP cameras, and webcams, available in various resolutions such as SD, HD, and 4K. This flexibility allows users to switch seamlessly between different camera types and NDI sources, facilitating diverse and dynamic live production setups.
Capture – The software supports advanced capture devices using the latest PCIe, Thunderbolt, and USB technologies from well-known manufacturers like Blackmagic Design, AJA, and Magewell. Users can capture high-quality audio and video through multiple methods, including USB and ASIO, ensuring optimal input quality for their productions.
Content Creation – vMix enables the creation of dynamic live productions by integrating live guests, NDI sources, videos, images, desktop capture, and SRT feeds. The platform’s customization features, such as the vMix GT Titler and data-driven content tools, allow for the animation and personalization of titles, enhancing the visual appeal and engagement of live streams.
Recording – Users can record their live productions in various high-quality formats, catering to different post-production needs. The vMix Multicorder, available in the vMix 4K and PRO versions, offers the capability to ISO record camera sources, simplifying the post-production process by providing individual camera feeds for detailed editing.
Streaming – vMix facilitates easy streaming to multiple platforms, including Facebook, YouTube, Twitch, and Vimeo, with just a few clicks. This feature ensures that live productions can reach a broad audience across various popular streaming services, maximizing viewer engagement and interaction.
Output – Finished live productions can be outputted to monitors, projectors, and TVs for immediate viewing. The software’s NDI support allows for the integration of production, audio, and individual camera feeds into other productions, promoting real-time collaboration. Additionally, vMix supports SRT for global streaming and SDI output for professional production environments.
Production Features – At the core of vMix’s capabilities are its production features, which include overlaying titles and graphics, mixing and switching content, and interacting with viewers via video calls (vMix Call). The platform also offers advanced audio monitoring and mixing, instant replay in 4K and Pro resolutions, and audience engagement tools through vMix Social.
vMix for Windows: Compatibility and Setup
| Component | Minimum | Recommended |
| Operating System | Windows 10 / 11 | Windows 10 / 11 |
| Processor | 2Ghz Quad-Core Processor |
Intel Core i7 Processor 3Ghz+
|
| Memory | 4GB DDR4 | 8GB DDR4 |
| Hard Drive | 7200 RPM Hard Drive (for recordings) | Solid State Disk |
| Graphics Card | Dedicated DirectX 10.1 Compatible |
Dedicated Nvidia Card with 2GB+ Memory
|
| Screen Resolution | 1920×1080 | 1920×1080 |
Installation Process for vMix
- Visit the vMix website and navigate to the download section.
- Download the latest version of the vMix installer.
- Locate the downloaded installer file on your computer.
- Double-click the installer file to start the installation process.
- Follow the on-screen instructions to proceed with the installation.
- Accept the license agreement and select the installation location.
- Click ‘Install’ to begin the installation process. Once the installation is complete, click ‘Finish’ to exit the installer.
- After installation, you can launch vMix from the desktop shortcut or the Start menu.
- Upon first launch, you may be prompted to enter a license key or start a trial period
vMix for Mac
vMix is primarily designed for Windows, and there is no native version of vMix software for mac available for macOS. However, Mac users can still run vMix by using alternative methods to create a suitable Windows environment on their Mac devices. Here are the most common approaches:
Using Boot Camp
Boot Camp is a utility that comes with macOS, allowing users to install and run Windows on a separate partition of their hard drive. This method provides the best performance for running vMix as it utilizes the full power of the Mac’s hardware.
“As of mid-2025, users running vMix via Parallels on M1 and M2 Macs report better stability than before, though high-load productions (e.g., 4K multiviews) still show occasional frame drops. Boot Camp remains the most reliable for intensive setups, though it is not officially available on Apple Silicon Macs.”
Using Virtualization Software
Virtualization software allows you to run Windows within macOS without rebooting. Popular options include Parallels Desktop, VMware Fusion, and VirtualBox. This method is convenient but may not offer the same performance as Boot Camp, especially for demanding applications like vMix.
Getting Started with vMix Studio live streaming
1. Download and Install vMix
Download: Go to the vMix website and download the installer for the latest version.
Install: Run the downloaded file and follow the installation prompts.
2. Set Up Your Inputs
Launch vMix: Open the vMix application.
Add Input: Click on Add Input in the bottom left corner.
Camera: Select Camera and choose your camera from the dropdown list. Configure resolution (e.g., 1920×1080) and frame rate (e.g., 30fps or 60fps).
NDI Source: Select NDI / Desktop Capture for network sources. Choose your NDI source from the list.
Explore More ✅
With VdoCipher, your videos are safeguarded from illegal downloads, ensuring your revenue stays where it belongs. See how we make it possible!
Screen Capture: For capturing your desktop, select Desktop Capture. Choose the display or application window you want to capture.
Media Files: For videos, images, or audio, select the appropriate input type and browse for your files.3. Configure Inputs
Input Settings: Right-click on an input and select Input Settings. Here you can adjust:
Color Correction: Adjust brightness, contrast, and color balance.
Chroma Key: Enable and configure chroma key for green screen effects.
Audio: Assign audio sources and adjust audio settings.
4. Create Multiviews and Layers
Multiview: Right-click on an input and select Multiview. Add other inputs as layers to create composite shots.
Layering: Adjust the position, scale, and crop of each layer within the multiview.
5. Audio Setup
Audio Mixer: Open the audio mixer by clicking on the Audio Mixer button.
Inputs: Ensure each audio input is assigned correctly (e.g., microphones, video audio).
Levels: Adjust the volume levels and apply audio effects like EQ and compression.
6. Add Overlays and Titles
Overlays: Click on the Overlay button (1, 2, 3, 4) to assign overlays.
Graphics: Add static or animated graphics as overlays.
Titles: Use the built-in title designer or import custom titles.
7. Configure Streaming Settings
Stream Settings: Click on Stream to open the streaming settings.
Destination: Select your streaming platform (YouTube, Facebook, Twitch, etc.).
Stream Key: Enter the stream key provided by your streaming platform.
Server URL: Enter the RTMP server URL if required.
Streaming Quality:
Resolution: Choose the output resolution (e.g., 1920×1080).
Bitrate: Set the bitrate according to your internet upload speed (e.g., 4000-6000 Kbps for 1080p).
Encoder: Select the encoder (e.g., x264 for software encoding or NVENC for NVIDIA GPU encoding).
8. Start Streaming
Start Stream: Click on the Stream button to start broadcasting.
Monitor: Keep an eye on the Stream panel for any alerts or issues.
9. Recording (Optional)
Record Settings: Click on Record to configure recording settings.
Format: Choose a recording format (e.g., MP4, AVI).
Destination: Select the destination folder for the recording.
Quality: Set the recording quality and resolution.
Start Recording: Click the Record button to start recording the live stream.
Steps needed to begin streaming to the web with vMix
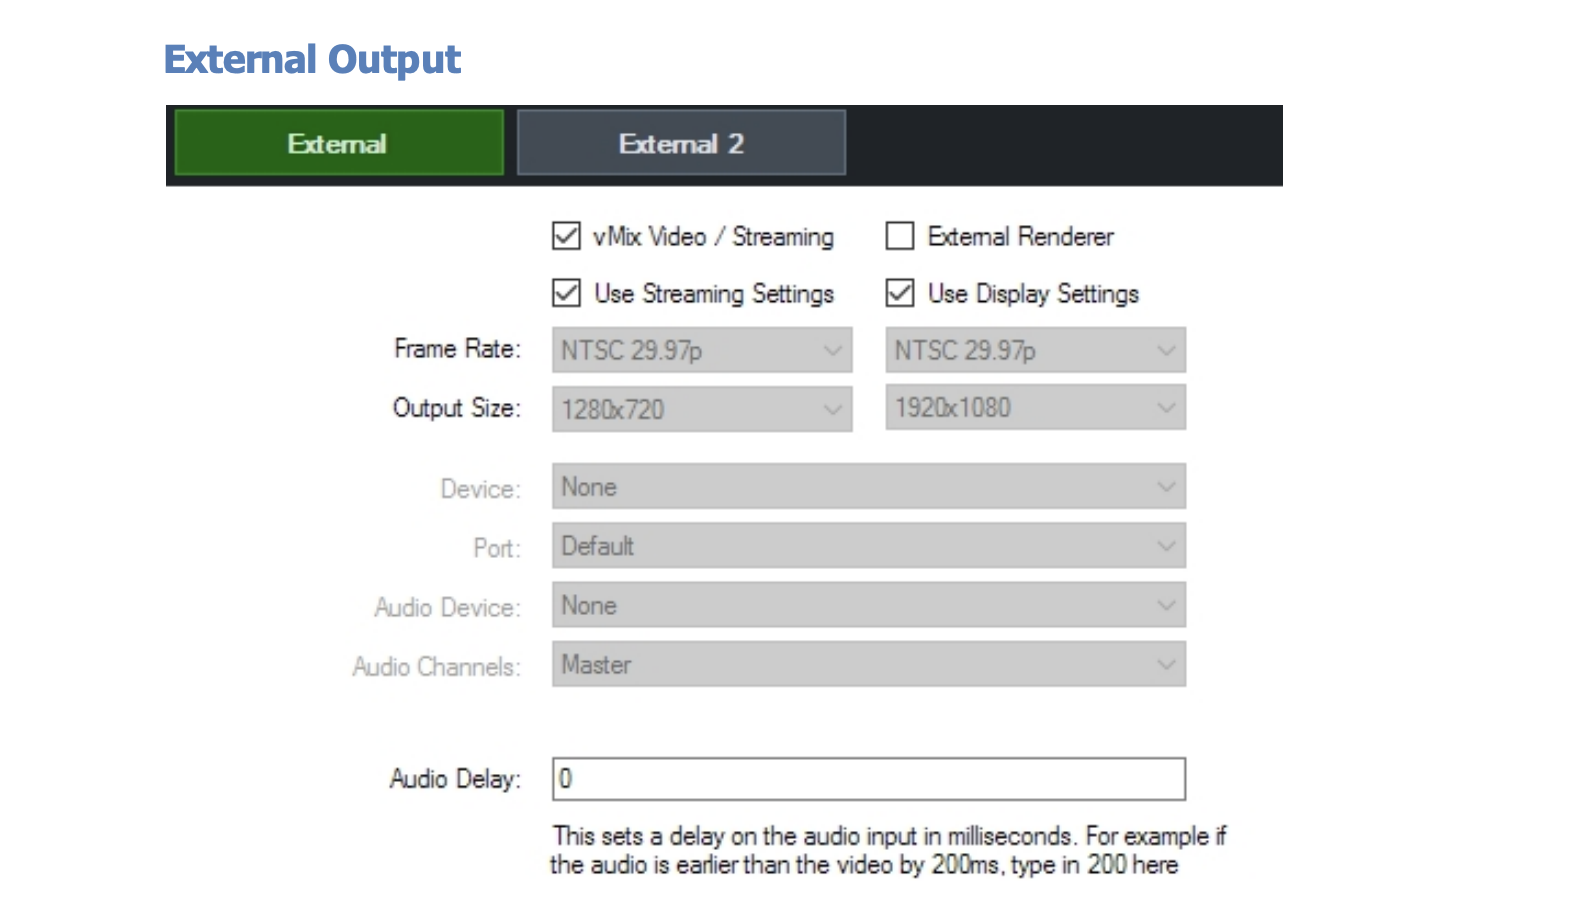
Step 1: Open the Streaming Window
Click the cog icon next to the “Stream” button in the main vMix interface.
Step 2: Access the Streaming Window
A new window dedicated to streaming settings will appear.
Step 3: Enter Your Streaming Provider Details
Choose your streaming provider from the drop-down menu. If your provider is not listed, select “Custom RTMP Server.”
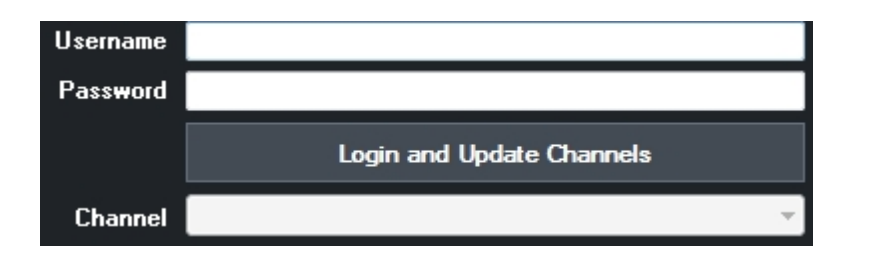
If your provider is listed, log in and select the desired channel directly from vMix.
For a custom setup, gather the following information from your streaming provider:
URL: For example, rtmp://example.com/live
Stream Name or Key: This might also be referred to as “Stream” or “Stream Name.”
Input this information into the provided fields.
Step 4: Select a Quality Setting
The quality of your stream will depend on your internet connection and your audience’s bandwidth.
The default setting of 360p at 1.5mbps is suitable for most broadband connections.
For custom quality settings, click the cog icon to open the “Streaming Quality” window and adjust according to your needs.
Step 5: Choose an Application
vMix comes with FFMPEG installed by default, which supports high-quality streaming with H264 video and AAC audio.
Optionally, you can install the Adobe Flash Media Live Encoder (FMLE) from Adobe’s website if your provider doesn’t support FFMPEG or if you require MP3 audio encoding.
Step 6: Start Streaming
Click “Start All” to initiate streaming. The button will turn red in both the Streaming window and the main vMix window, indicating that streaming is active.
If you encounter an error, double-check your settings from Step 3 to ensure they match the details provided by your streaming provider.
This streamlined process ensures a smooth start to your live streaming experience with vMix.
vMix 29 (2025): Major Performance & Workflow Upgrades
The vMix 29 (October 2025) release focuses heavily on performance efficiency, professional replay workflows, and production scalability, especially for sports, events, and broadcast-style live streaming. Rather than adding surface-level features, vMix 29 optimizes how video, audio, and replay systems work at scale.
Open Media Transport (OMT): High-Quality Video Over LAN Without the CPU Hit
One of the most important additions in vMix 29 is support for Open Media Transport (OMT), a new open-source protocol designed for high-quality, low-latency audio and video transmission over a gigabit LAN.
- Supports full 4K and very high frame rates (120fps+)
- Enables direct recording into Instant Replay and MultiCorder without re-encoding
- Significantly reduces CPU usage, especially in replay-heavy setups
- Built-in fault tolerance gracefully handles corrupted video packets
- Multiple quality presets (Low / Medium / High) let you balance bandwidth vs quality better than NDI-style workflows
For sports productions, multi-camera studios, and LAN-based OB setups, OMT allows you to move ultra-high-quality feeds between machines without choking system resources, something that becomes critical as productions scale.
Instant Replay: Up to 50% Lower CPU Usage + Advanced Control
Instant Replay gets one of its biggest performance boosts to date in vMix 29.
Key improvements include:
- Up to 50% reduction in CPU usage during both recording and playback
- New Configure Storage option to assign separate drives per camera
- Support for multiple tags per replay event
- Drag-and-drop replay events into folders for faster organization
- Quad View Mode to preview four camera angles simultaneously in high quality
This turns Instant Replay into a far more broadcast-grade replay system, especially useful for Live sports, Esports tournaments, and Multi-angle event coverage
New replay-specific activators and shortcuts also make automation much easier, letting operators trigger replay modes, quad view, or channel switching without manual UI interaction.
Expanded Overlay System: From 4 to 8 Overlays
vMix 29 doubles the number of available overlay channels, moving from 4 to 8 overlays in HD and higher editions.
Practical impact:
- More simultaneous lower-thirds, graphics, bugs, and sponsor elements
- Increased stinger transitions (now up to 8)
- Updated input button layout for cleaner overlay management
- New shortcuts and activators designed specifically for expanded overlay control
This is especially valuable for news-style layouts, sports broadcasts, and branded live streams where multiple persistent graphics are common.
Programmable GO (POG): Replacing QuickPlay With Smart Actions
The classic QuickPlay button has been replaced with a much more powerful concept: GO (Programmable Option Gateway).
By default, GO behaves like QuickPlay, but it can now be configured to Trigger transitions, Execute shortcuts, and launch fully customized actions per input
Hovering over the GO button reveals its assigned function, making it both powerful and operator-friendly. This dramatically improves live switching speed and automation, especially in fast-paced environments.
Zoom Integration: Direct Support for Zoom Events & Sessions
vMix 29 improves Zoom workflows by adding:
- Direct connectivity to Zoom Events and Sessions
- Participant search inside the Zoom Manager
For hybrid events and virtual conferences, this reduces friction when managing large Zoom-based panels inside a live production pipeline.
Audio Enhancements: More Bus Flexibility for Complex Mixes
Audio routing becomes more flexible with five new bus configurations: AB, CD, DE, ABCD, and DEFG.
Additionally, all audio buses are now selectable for MultiCorder, not just the Master bus. This allows:
- Cleaner post-production workflows
- Isolated audio recording per source or group
- Better redundancy for broadcast delivery
- Smarter Triggers & Workflow Refinements
Other notable workflow upgrades include:
- New trigger types: OnCountdownTime and OnCountdownRemaining for title countdowns
- New AlphaFade transition, optimized for alpha-to-alpha blending
- Optional thumbnail generation disablement for large photo sets (faster load times)
- Improved slideshow behavior with filename visibility when thumbnails are disabled
These updates may seem small individually, but together they make vMix more predictable, automatable, and stable under heavy load.
If your existing vMix workflow was already solid, vMix 29 lets you do more with the same hardware or achieve the same quality with less strain.
vMix vs OBS vs Wirecast: which is better for live streaming?
vMix and OBS Studio are both popular choices for live streaming and video production, each with its unique strengths. Deciding which one is better depends on the complexity of your shows and specific production needs.
Why vMix is Considered Better for Complex Shows
Multiple Output Streaming: vMix allows for multiple different output streams simultaneously, which is beneficial for complex productions needing various stream outputs.
vMix Call: This feature enables easy integration of remote participants, supporting up to 8 guests. Each participant can have a customized view, such as a teleprompter feed, enhancing the remote production capabilities.
Multi-corder: vMix can record multiple inputs simultaneously, making it a robust choice for productions requiring extensive recording capabilities.
Real-time Animated Graphics: vMix supports sophisticated real-time animated graphics, providing a polished look to broadcasts.
Web Controller: This feature allows a second operator to manage graphics or curate social media questions, adding an extra layer of operational efficiency.
Robust Scripting: vMix offers powerful scripting capabilities to automate transitions and other actions, which can be assigned to hotkeys for quick access during live shows.
Audio Busses: vMix supports creating audio sub-mixes, grouping audio sources together for easier control, and even creating virtual talkback systems for remote talent.
What Reddit users say:
Color Correction and Overlay Channels: vMix has built-in color correction and overlay channels, allowing for advanced visual adjustments and overlays.
Ease of Use for Complex Shows: vMix functions like a traditional switcher and control room, making it easier to manage complex inputs and outputs compared to OBS.
Professional Feel: Users report that vMix feels more reliable and robust, especially for professional or “big boy” productions.
Data Source Integration: vMix offers advanced data source integration, allowing for dynamic content updates, which can be crucial for live sports or news broadcasts.
OBS Studio: The Cost-Effective Alternative
Free and Open Source: OBS is free, making it a great choice for budget-conscious users or simple setups.
Good for Basic Streaming: OBS is sufficient for basic streaming tasks, such as streaming a few webcams for a YouTube video.
Community Support: As an open-source tool, OBS benefits from a large community of users and developers contributing to its improvement and offering support.
While OBS Studio is excellent for simpler setups and those on a tight budget, vMix is preferred for more complex live streaming software due to its extensive features, ease of use for professional setups, and robust performance. If your needs include multiple outputs, remote guest integration, advanced graphics, and scripting, vMix is likely the better choice. For simpler or budget-friendly projects, OBS Studio remains a strong contender.
vMix vs OBS Studio vs Wirecast
| Feature | vMix | OBS Studio | Wirecast |
| Price | $60 – $1200 (Various Editions) | Free | $599 – $799 (Various Editions) |
| Platform | Windows | Windows, macOS, Linux | Windows, macOS |
| User Interface | Professional, customizable, intuitive | Simple, but less intuitive for complex setups |
Professional, customizable, intuitive
|
| Multiple Outputs | Yes | Limited | Yes |
| Remote Guest Integration | vMix Call (up to 8 guests) | Limited (via plugins) |
Wirecast Rendezvous (up to 7 guests)
|
| Recording Options | Multi-corder (record multiple inputs) | Basic single stream recording | Multi-track recording |
| Real-time Graphics | Advanced animated graphics | Basic static graphics | Advanced animated graphics |
| Audio Mixing | Advanced audio bus system, virtual talkback | Basic audio mixing |
Advanced audio mixing with multi-channel support
|
| Scripting and Automation | Yes | Limited (via plugins) | Limited |
| Color Correction | Yes | Basic | Yes |
| Streaming Services Support | Extensive (including AV1, HEVC) | Extensive (basic RTMP, SRT support) |
Extensive (including RTMP, SRT)
|
| Hardware Acceleration | NVIDIA GPU acceleration for encoding | Limited GPU acceleration | GPU acceleration available |
| Overlay Channels | 4 overlay channels with custom transitions | Limited |
Multiple layers and overlay channels
|
| NDI Support | Full NDI capabilities | Limited NDI support | Full NDI capabilities |
| Trial Version | Free 60-day trial | Free (open source) | Free trial available |
| Community and Support | Active user community, professional support | Large open-source community, forum support |
Professional support, active user community
|
| System Requirements | Higher due to advanced features | Lower, suitable for basic setups | Moderate, similar to vMix |
vMix Live Streaming Software Pricing
vMix offers both lifetime and subscription licensing options, each with different features and prices to accommodate various needs and budgets.
| License Type | Price | Description | Inputs | Resolution | Key Features |
| BASIC HD | $60 USD | Suitable for smaller productions. | 4 total, 3 camera/NDI | 1920 x 1080 | |
| HD | $350 USD | Designed for more advanced productions. | 1000 total, 1000 camera/NDI | 1920 x 1080 | Recording, streaming, fullscreen output, basic GT Designer |
| 4K | $700 USD | For high-resolution productions. | 1000 total, 1000 camera/NDI | 4096 x 2160 | 2 recorders, 1 camera instant replay, MultiCorder, advanced GT Designer |
| PRO | $1200 USD | For professional-grade productions. | 1000 total, 1000 camera/NDI | 4096 x 2160 | 4K features, up to 8 callers via vMix Call, 8 camera instant replay, four external outputs |
| MAX (Subscription) | $50 USD/month | Ideal for users needing the highest level of features on a subscription basis. | 1000 total, 1000 camera/NDI | 4096 x 2160 | All PRO features, continuous updates while subscribed, advanced recording, streaming, full external output |
Summary
- BASIC HD: Best for small-scale productions with essential features.
- HD: Suitable for more complex setups with enhanced input capacity and basic advanced features.
- 4K: Offers high-resolution support and more advanced features for significant productions.
- PRO: Provides a comprehensive set of tools for professional-level productions.
- MAX: Subscription-based option with all the PRO features and continuous updates, ideal for those preferring a monthly payment model.
Common vMix Issues & Fixes
Recommended Setup for Guests
- For the best vMix Call experience, ensure guests have:
- PC/Laptop (Intel, 2009 or newer)
- Windows 10 with Google Chrome 56+ (preferred)
- HD USB Webcam (e.g., Logitech C920)
- Headset/Earphones + USB Microphone
- Internet speed: At least 2Mbps upload (wired Ethernet preferred)
No Video/Audio from Guest
- Ensure the guest’s webcam and microphone are plugged in and selected.
- In Google Chrome, click the camera icon in the address bar to configure settings.
- In Firefox, allow camera and mic access every time the call connects.
Guest Disconnected – No Video/Audio
- This happens due to internet disconnection.
- Solution: Refresh the browser page to reconnect automatically.
Guest’s Video Tile Flashes Orange/Amber
- Indicates network congestion between vMix and the guest.
- Solution: Wait for a few seconds. vMix will adjust automatically.
- Lower the return video quality by right-clicking the Call input in vMix.
Low-Quality Video or Audio
- Network upload speed might be below 2Mbps.
- Check internet speed (Fast.com or Speedtest).
- Use a wired Ethernet connection and close background apps.
- Try a different webcam if video remains blurry.
Choppy or Lagging Video/Audio
- Causes – Network congestion, poor lighting, or device performance issues.
- Fix – Improve lighting, pause background downloads, or restart the browser.
High Latency in vMix Call
- Normal latency range: 200ms for local networks
- 1-1.5 seconds for distant locations
- If latency suddenly increases, refresh the browser to reset the Jitter Buffer.
Echo or Audio Feedback from Guest
- Cause – Guest is using speakers instead of headphones.
- Solution – Use headphones or earphones to eliminate echo.
If using speakers, a directional microphone can help reduce feedback.
| Issue | Cause | Fix |
| AV1 stream stutters | Incompatible GPU or outdated drivers |
Use HEVC instead or update GPU drivers
|
| Zoom participant audio delay | Buffering mismatch |
Use “Low Latency” Zoom profile and enable PFL (Pre-Fader Listen)
|
| SRT feed lagging | High jitter on public internet |
Switch to fixed latency SRT + prioritize port in firewall/router
|
| Replay freezing with multiple cameras | Disk write speed too low |
Use SSD with 500MB/s+ write speed or split recording to two drives
|
Final Tips for a Smooth vMix Call
- Test video & audio settings before going live.
- Use a wired internet connection instead of Wi-Fi.
- Keep Chrome/Firefox updated for best performance.
- Restart device & browser if issues persist.
FAQs
What are vMix virtual sets?
vMix Virtual Sets are pre-designed, customizable virtual backgrounds integrated within the vMix software, a popular tool for live streaming and video production. These sets feature high-quality graphics and multiple camera angles, providing a professional look for various productions, such as news broadcasts, talk shows, and webinars. They can be easily customized to match branding needs by adjusting colors, adding logos, and configuring layouts.
Can I record in 4K with vMix 4K?
Yes, vMix 4K allows you to record your productions in stunning 4K resolution.
What is vMix Studio?
vMix Studio is a comprehensive live video production software enabling users to produce, stream, and record professional-quality video content.
How can I use vMix software on a Mac?
You can use vMix software on a Mac by running Windows through Boot Camp or virtualization software such as Parallels Desktop.
Is there a free trial for vMix software?
Yes, vMix offers a 60-day free trial for all versions.
What is vMix Advanced?
vMix Advanced refers to the more advanced features of the vMix software, such as multi-camera mixing, instant replays, and advanced graphics.
Supercharge Your Business with Videos
At VdoCipher we maintain the strongest content protection for videos. We also deliver the best viewer experience with brand friendly customisations. We'd love to hear from you, and help boost your video streaming business.


Jyoti began her career as a software engineer in HCL with UNHCR as a client. She started evolving her technical and marketing skills to become a full-time Content Marketer at VdoCipher.