You feel you have a unique understanding of a subject domain. You also feel that you can effectively communicate your expert knowledge through an online video course. But, however, you do not quite know how and where to get started.
Here at VdoCipher, we assist E-learning video providers to securely host their online video courses. We bring you a step-by-step guideline on how to conceptualize and produce your E-learning course.
Table Of Content:
-
- Choosing a Profitable and Sellable Idea for Online Course Videos
- Presentation Techniques for Sellable Online Course Video
- Common Types of Online Course Video
- Strategies for Optimal Learning Goal Fulfillment
- Step-by-Step Sequence of Content in Online Course Videos
- Pre-Production Steps in Online Video Course
- Pre-Production Task for Creating Your Sellable Video Course
- Important Video Production Task for Online Course Creation
- Setting a Price for Your Online Course Videos
- Mistakes People Make When Creating Online Course Videos
- FAQs
Choosing a Profitable and Sellable Idea for Online Course Videos
To develop a successful online course, you need to select a profitable and appealing idea. Avoid the mistake of creating a course without first ensuring there’s a demand for the topic. Here are some strategies to help you choose a profitable idea for your online course:
- Embrace Competition: If someone has already created a course similar to your idea, that’s a positive sign. It indicates there’s a market and demand for the subject. Avoid creating a course on a topic that has never been covered, as it may indicate a lack of interest.
- Leverage Your Expertise: Consider the areas where people often seek your advice or ask you questions. Your expertise in these subjects can serve as the foundation for a profitable course.
- Consider Client Struggles: If you’re a freelancer or running a service business, identify the common issues your clients face and the questions they ask. These insights can help you create a course addressing their needs.
- Identify and Solve Pain Points: Research real-world problems people experience and design a course that solves those issues. People invest in courses to address specific problems or improve their lives, so focus on creating a course that offers practical solutions.
- Be Specific: The more precisely you address a problem, the easier it will be to sell your course. Whether it’s an immediate issue or a long-term challenge, a targeted approach makes your course more appealing to potential buyers.
To choose a profitable course idea, use these strategies to identify pain points and offer solutions. Ensure there’s a market demand for your topic and focus on addressing specific problems with practical solutions.
Presentation Techniques for Sellable Online Course Video
To create effective online course videos which can sell, consider these two learning principles that address human embodiment and instructional media presentation.
Personalization Principle:
To foster a sense of connection and encourage deeper cognitive processing, adopt a more conversational and interactive teaching style. Incorporate these approaches:
- Use conversational language instead of formal style.
- Employ effective on-screen coaches.
- Make the instructor visible.
For example, experiment with team teaching, where multiple instructors appear on the screen and discuss course topics, stimulating student interest and engagement.
Multimedia Principle:
Enhance the learning experience by using a combination of visuals and audio narration, rather than relying solely on text. Apply these strategies when designing instructional videos:
- Use graphics, charts, or animations to support the content presentation.
- Prepare visuals in advance to allow for iteration and refinement, improving the overall quality of the final product.
- Reduce cognitive load during recording by allowing instructors to focus on narration without worrying about visuals, pen colors, or handwriting legibility.
By incorporating these presentation techniques, you can create engaging and effective online course videos that promote a better learning experience for your students.
Common Types of Online Course Video
Online course videos can take various forms to effectively communicate information, concepts, or processes. Here are some common types of instructional videos:
- Tutorial Videos: Often called “how-to” videos, these provide step-by-step instructions to teach a process or demonstrate a skill, making them an ideal instructional method.
- Lecture or Presentation Recordings: By recording lectures or presentations, the instructional content becomes accessible for review or consumption at a later time. These videos tend to be longer and require more commitment from the audience.
- Training Videos: Aimed at improving employees’ workplace skills, training videos typically feature real people to establish a connection between the trainer and the trainee.
- Microvideos: These short videos concentrate on teaching a single, specific topic, allowing for quick and focused learning.
- Explainer Videos: These videos present complex ideas or products in a visually engaging and straightforward manner, making it easier for viewers to grasp the concept.
- Screencasts: Quick and informal, screencasts primarily consist of screen recordings that teach tasks or share knowledge.
Despite their different names, all created online course videos share the same goal: to instruct. While keeping videos engaging is important, the primary objective is for viewers to understand and learn from the content.
Strategies for Optimal Learning Goal Fulfillment
To maximize learning outcomes, utilize these four tactics:
- Learning by Examples: Use video lessons to showcase pertinent examples. They offer a glimpse into experiences that learners might not have encountered before. Visuals, animations, and video clips—with audio—bring these examples to life. In this matter, a corporate video agency can expertly craft these videos, infusing professionalism and creativity into the learning process.
- Active learning: Studies show it boosts student morale and results. Combine video clips and interactive tasks to stimulate students’ minds and bodies. They’ll think and act, immersing themselves in the process.
- Adaptive feedback: Give students chances to practice and receive feedback, as practicing without it doesn’t help to learn. In asynchronous online settings, adaptive feedback shines—it checks answers and offers customized guidance for diverse responses. This will ultimately enhance the learning experience and potentially leading to a higher Net Promoter Score as students feel more supported and engaged.
- Reflection: Weave reflection activities into your curriculum. They foster metacognition and learning through representation. Reflective tools—like journals, logs, diaries, peer/self-assessments, and portfolios—can boost the learning journey.
Step-by-Step Sequence of Content in Online Course Videos
When designing impactful online course videos, adopt a problem-centered strategy with four instructional phases. This framework propels learners through an engaging and fluid learning journey.
- Introduction to Prior Knowledge: Kick-off by tapping into learners’ pre-existing knowledge and experiences. This step forges connections between new and familiar information, anchoring a robust learning base.
- Skill Showcasing: Next, exhibit the skills or concepts students must master. Leverage vivid examples, visuals, and elucidation to convey knowledge effectively, letting students absorb and digest new abilities.
- Skill Utilization: Encourage students to employ newfound skills or knowledge via hands-on tasks, exercises, or conundrums. This stage fosters active learning, bolstering students’ comprehension through practice.
- Real-Life Skill Fusion: Lastly, steer learners toward weaving their freshly honed skills into real-world scenarios. This final stage champions practical knowledge application, ensuring students can transfer their expertise into genuine situations.
Explore More ✅
VdoCipher helps over 3000+ customers from over 120+ countries to host their videos securely, helping them to boost their video revenues.
Pre-Production Steps in Online Video Course
The steps in the pre-production process are:
- Identifying the course goal – are the videos the sole educational material, or are they part of a Flipped Classroom
- Gathering content – At this stage of storyboarding, you consult Subject Matter Experts (SMEs) to create basic content
- Defining objectives – This step involves creating a course outline, specifically to decide how you are going to present the content towards achieving the course goal.
- Creating assessment criteria – How does the course align with the different targets that an e-learning course must satisfy? Learner assessment criteria include knowledge retention, attitude towards newer material in the discipline, and problem-solving skills. Understanding the importance of each of these three targets is critical to the design of your online video course. For example, if the course objective is to enhance workplace collaboration, the assessment criteria should be target based.
- Using Storyboard template – At this stage organize your content into chunks using a storyboarding template
- Picking design model – Choose which e-learning theory to prioritize. Some of the widely prevalent design models currently in use are: ADDIE , Knirk and Gustafson, SAM, Action Mapping Process, Gagne’s 9 Principles
- Choosing design elements – Images, videos, interactions, quizzes
- Selecting an authoring tool – Articulate Storyline, Lectora, Adobe Captivate, Moodle, Claro, Udutu
Pre-Production Task for Creating Your Sellable Video Course
Online Video Course Outline
It is very important to first develop a course outline before beginning production on your online video course. The course outline is very important in bringing all stakeholders involved in the course production on the same level. This ensures that all the scripting and production efforts go smoothly subsequently. The course outline may get updated multiple times, as more feedback is received from people involved in your course. The process of storyboarding involves considerable time and effort, and sketching an outline is necessary to ensure that this process goes smoothly.

Storyboarding
Storyboarding is the process of graphically organizing your video content for the purpose of pre-visualizing the e-learning video. It is a great way to organize ideas and to ensure that the visual and audio forms you use will be effective in communicating your course in a logical manner.
The term storyboard comes from movie production, and the process was most prominently used by Walt Disney in the 1930s. It is a great way for you to organize your ideas, and to make sure that your ideas are communicated to your audience in a logical manner. For this reason, having a carefully designed is crucial to making a quality online course video.

Storyboarding is distinct from a script in that it is a graphic sketch of the course progression. During the storyboarding stage, you decide on the visuals for your online course video and accordingly write your final script to correspond to the visual sequence designed. Storyboarding is essential for scriptwriting as it lays the foundation for the visual sequence that the script and AI essay writer work in tandem to bring to life, ensuring a harmonious fusion of narrative and imagery.
Using storyboarding, as a course designer you can evaluate multiple scenarios for creating your online course video. Through this means they can understand better at what points during their content creation they should be adding interactive features for a more active response from learners. Storyboarding is the first step in creating a simulation of your course, so that everybody in the development team can come together on board. You can sequence instructions, and document changes conveniently using this method.
One tip when you start your course creation with storyboarding is that you should show the most engaging part of your video course first to the learner. This is useful in hooking their attention. This may be an illustration of the course objective, or could as well be an interesting application of the course. Showing the learners highly relevant and interesting content at the outset is a great way to ensure active learning on the part of learners.
Authoring Tools
Online Authoring Tools enable you to integrate different media to bring together content for training and education. A good authoring tool would give you a means for creating your online video course, ensuring that you succeed in making engaging and interactive e-learning content. Authoring tools provide a comprehensive solution for the different stages of online video course creation. These stages of course creation include storyboarding, making video block diagrams, and in editing of video content. Authoring tools also offer a variety of templates to follow in the course creation, using which you can better organize your multimedia content.
A major utility of authoring tools is that they enable the custom design of the online video course. Creating increasingly complex training solutions is facilitated by authoring tools such as Articulate Storyline, Adobe Captivate, and Elucidat. Rapid E-Learning is the process of high-speed deployment of training content in response to fast-evolving training requirements. Courses produced in the Rapid E-Learning paradigm are relevant for a short period of time, and the speed of course creation is therefore very important. For this particular requirement of rapid course deployment, a good E-learning tool is very important.
Some other critical services are mentioned in the following useful blogs – Blog on LMS & Blog on Class Registration Software
Important Video Production Task for Online Course Creation
Lighting
Lighting is the most critical element of the E-learning course creation process. Three-point lighting is the most commonly used method for the shooting of E-learning videos. This lighting system comprises a bright light on one side, and another more gentle light on the other side, with less brightness. This creates a more three-dimensional effect. The third light shining on the backdrop helps make you stand out from the backdrop and eliminate shadow.
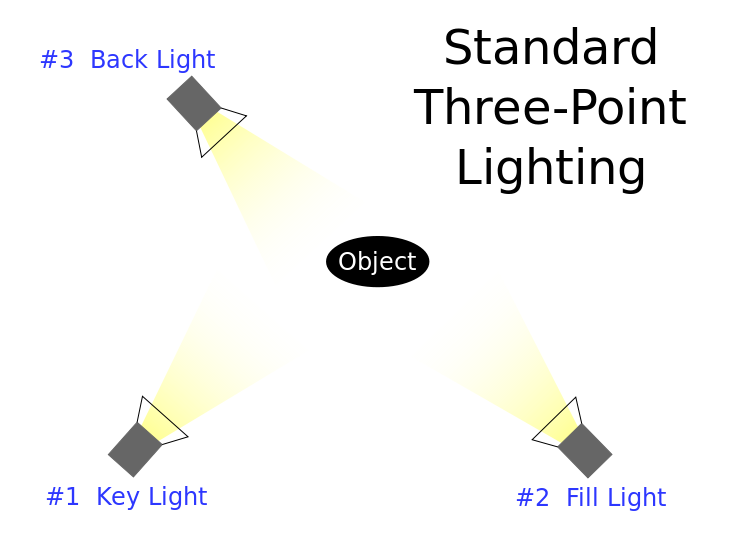
Key Light – This is the main light, placed to the side of the camera. This light is usually the strongest and influences the look of the stage the most. One side is more well lit whereas the second side has some shadow.
Fill Light – Secondary light, placed on the opposite side of the key light. Used to fill shadows created by the key light. This light is necessarily softer and more distant than the fill light. A reflector can be also be used in place of fill light to achieve the same softer, subtle effect.
Back Light – This light is placed behind the subject, and lights the subject from the rear. Its purpose it to provide definition and highlight the subject’s outlines. This provides depth to the video, separating the subject from the background, and providing a three-dimensional look.
In a four-point lighting system, a fourth light is used to light up the background. This eliminates any shadows from the background and also adds depth to the video. The three-dimensional effect more significantly separates the subject from the background.
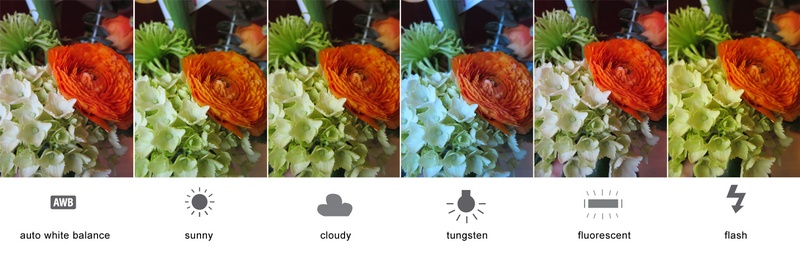
White Balance
Every different light setting indoors or outdoors has an associated light temperature. Achieving white balance is the process of identifying the appropriate light temperature at which to do the filming in a particular location. This is useful in designing of lighting systems for shooting indoors, when you are using different indoor locations for your course video. Essentially it is the process of removing color casts, so that an object that appears white in person appears white in camera. Digital Cameras in indoor lighting can create blue, orange or green color casts, giving a white colored object these shades. White Balancing ensures that in the process of post-production they are appropriately edited out. A slate with color chart can be very useful in this.
Video Block Diagram
This is the process of making block diagrams of your video shooting space. Shot Designer is a a very good software used for drawing video blocks.

Blocking is a concept derived from theatre, and is used to figure out the positioning of actors and props on the stage, so that the performance is never obstructed. Block diagrams enable video producers to map potential obstructions on set, camera and actor movement, and lighting, to ensure that the placement of all elements on the production stage is optimal.
Slate and Clapboard
Video slates are used during the production process to help in editing video shots being taken. During production, scenes are shot incoherently. The production slate is used to help make sense of all the shooting using a visual cue. The production slate includes details for:
- Roll Number (or SD Card Number)
- Scene Name
- Scene Take number
- Production Working Title
- Director
- Camera
- Camera Number (for multi-camera production)
- FPS (Frames Per Second)
- Date of shooting
Because these details are immediately visible when the slate is placed before the video film, any shot can be uniquely identified, even when fast-forwarding the video. Essentially when the video is ready for editing, editors can conveniently refer to the information recorded on the slate for easy sorting. In the absence of a production slate, you may use other visual cues to identify a successful take, for example covering the camera with your hand at the end of a successful take.
The production slate and the clapboard are often combined. The clapboard is used primarily to sync audio and video. This is particularly useful in the case wherein the audio mic does not feed directly to the camera, and the two streams are out of sync. During the stage of video editing, there is a large spike in audio at the point when the clapboard is shut, which can be matched to the same point in the video where the clapboard can be seen to be shut. Matching the two becomes very easy once the two-time points in audio and video recording are matched. Even when the audio mic feeds directly to the camera, editing using a clapboard can be used to eliminate any lag in either audio or video.
Another addition to the production slates is a set of colored stripes. This is used for color grading. Using this it can be ensured that the video is color-correct, so that white, black and all other colors come out in the same color in the video as on the slate.
Microphones
A lapel mic placed on the inside of the shirt can be used for recording audio. For higher quality, boom mics may be used. This mic is placed on a boom pole, which can be wired to the camera. This microphone is mostly placed over the speaker, but mostly out of frame of the shot. The microphone may be above or below the frame, but should always be placed in front of the speaker.
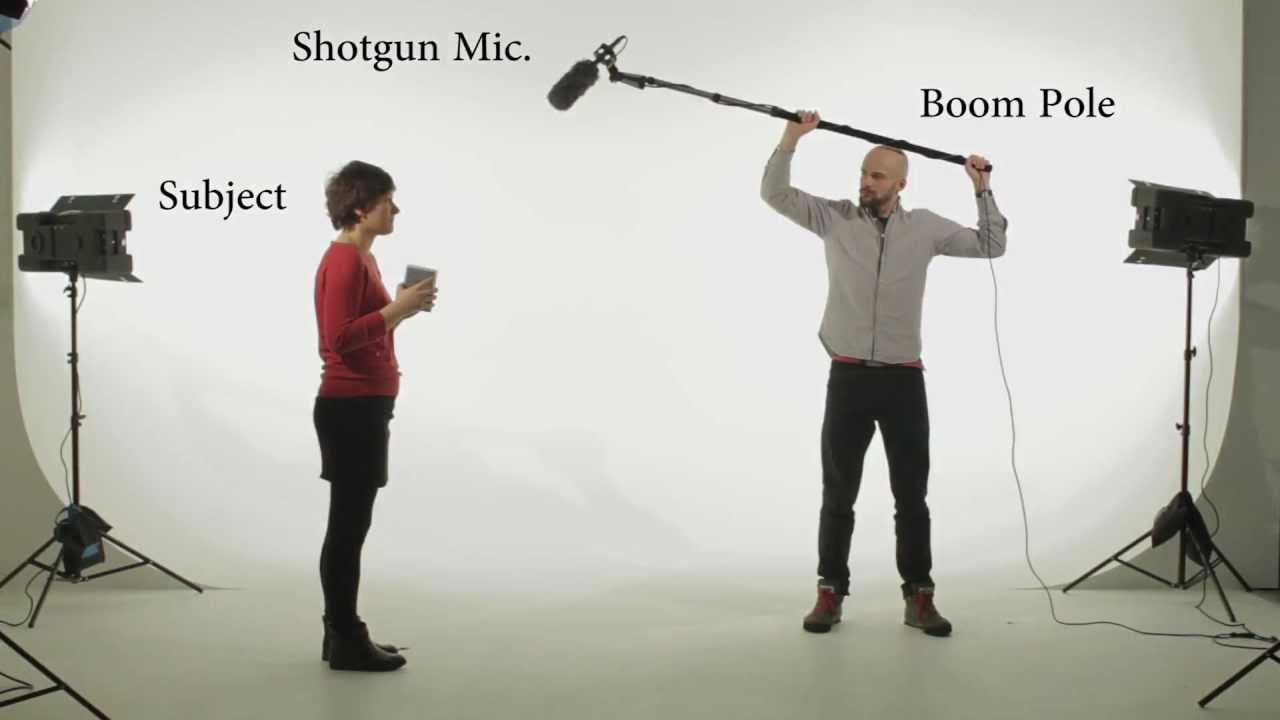
Headphones should be connected to the microphone as well, so that the audio recorded can be monitored live, as the recording actually takes place. This is necessary for ensuring that no ambient noises sneak into the audio. Finding noises in the recording during the stage of editing and post-production is a very nasty surprise, as background noises considerably decrease the overall video quality.
You can also opt for audio recording in a studio for sections of video over a screencast, or in cases of long monologues that do not require a visual performance from the presenter. There is a shift in sound quality between stage audio and studio-recorded sound, but this is not a major problem, as the gains in audio quality during audio-important sections offsets the discontinuity. Better voiceover quality in certain sections will definitely improve the overall quality of your video course.
Headset vs mounted mics – Headsets are better when the speaker is moving within the recording. Otherwise mounted mics offer much better quality.
Background Audio
It is recommended that light background music is played. This is because only using voiceover narration becomes monotonic after a while, leading to audio fatigue in learners. To modulate the background music so that it does not interfere with the narration you may opt for the following techniques:
Ducking is a technique offered by video editing software Camtasia. This is the process of lowering volume of background track when narration is happening, and raising the volume it when there is no narration.
Notching is a technique offered by the (free) audio editor Audacity. The frequencies in the background music may overlap with those of the narrator’s voice. It is important to remove the frequencies from background music that match the majority of frequencies in the voice of the narrator. This means that when narrating those frequencies are used exclusively by the narrator, and the brain does not confuse the two. Background music is mainly used to avoid audio fatigue.
Using Screencasting
Screencasting is the process of recording a video of your desktop or mobile screen. The recorded video can be edited for use in your online video course. Screencasting is very useful in e-Learning courses that explain the use of software tools and coding. Custom screencasting software such as Screenflow and Camtasia lets you add voiceovers, text, and animations. This makes screencasting a very powerful tool in your online video course. Screencasts are combined with subject narration to offer variety within the video. This makes the video more engaging and prevents it from becoming monotonous. Articulate Replay works well for integrating webcam video with screen recording.
There are more basic screencasting tools available for free. Some recommended screencasting tools are Ezvid, Screenr and Rylstim Screen Recorder.
Using Whiteboard
Whiteboard presentations are a great way to communicate complex concepts. A whiteboard allows an easy overview of your course content, using which you can then unpack specific elements of the online course. Whiteboards are a great way to walk the audience through complicated steps, as during the process the narrator is providing active commentary on how the problem is solved.
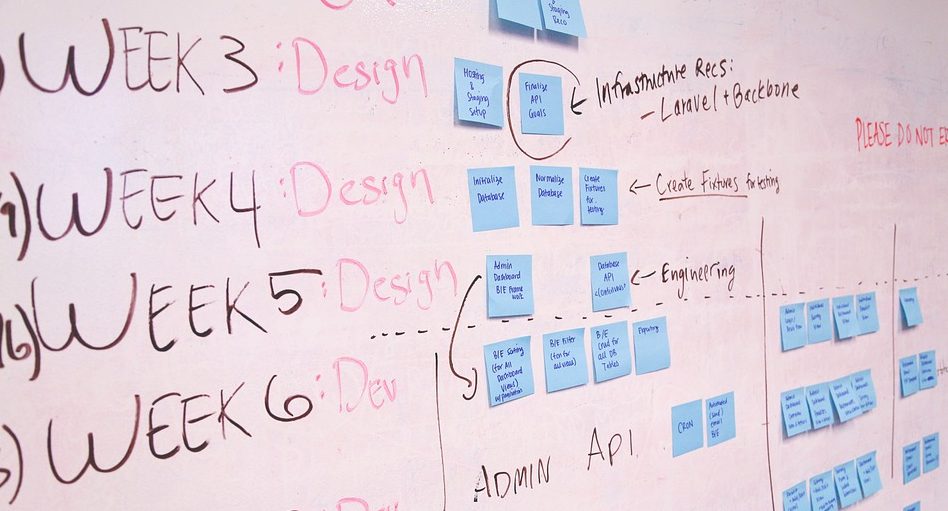
This is a very easy-to-use tool and features both the presenter and the whiteboard. With this additional element in your e-learning video, you also need to manage lighting for the whiteboard so that it is not obstructed by shadows and is uniformly lighted.
For this purpose, a four-point lighting system should be used. This comprises of a key and fill light in front of the presenter, on either side of the camera. These 2 lights should be at a height above the presenter, and at the same distance as the camera.
The remaining two lights are to be covered by flatboards to eliminate glare, and should therefore provide uniform illumination of the whiteboard. These 2 fill lights will essentially eliminate shadows and continue the focus on the whiteboard.
Whiteboard animation
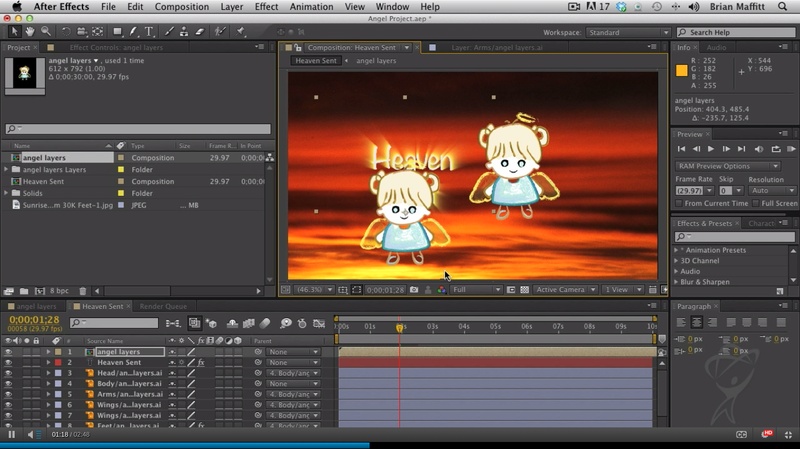
Whiteboard animations are videos that use the concept of the whiteboard to show the learner a series of concepts, using hand-drawn figures. These animations essentially eliminates the physical whiteboard, to be replaced by a digital whiteboard, used by software such VideoScribe and Adobe AfterEffects. A whiteboard animation video can be made for the duration of 30 seconds to 5 minutes and is very useful in presenting an information-heavy message effectively.
Setting a Price for Your Online Course Videos
Determining the right price for your online course can be a challenging task. It’s essential to understand that people are willing to pay for courses even if they can find similar information for free. Online courses offer advantages such as a structured approach, dedicated support, personal accountability, and a community of like-minded students. To set a fair price for your course, consider using the “Similar Outcome Approach.”
- Identify the Ideal Outcome: Think about the desired results for someone who completes your course. What would they gain, and how would it improve their life?
- Assess Alternative Costs: Ask yourself what someone would have to pay to achieve the same results through other methods. Compare your course’s value to that of other courses, software, hiring a professional, or coaching services.
- Consider the Cost of Inaction: Reflect on the consequences of not taking your course. For example, if your course helps people improve their health, think about the long-term benefits and how much that is worth compared to a simple collection of videos and PDFs.
- Position Your Price Appropriately: While it’s important to set a fair price, don’t obsess over optimizing it. Instead, focus on positioning your course within an appropriate price range, considering the value it provides and the costs associated with alternative solutions.
Explore More ✅
VdoCipher helps over 3000+ customers from over 120+ countries to host their videos securely, helping them to boost their video revenues.
Mistakes People Make When Creating Online Course Videos
When creating online course videos, it’s essential to avoid common mistakes that could impact their effectiveness. Here are some pitfalls to watch out for:
- Not Knowing Your Audience: Failing to understand your target audience can lead to a less focused and less helpful video. Get to know your audience, their needs, preferences, and motivations, to create more tailored and engaging content.
- Overemphasis on Equipment: While having high-quality equipment can be beneficial, it is not a requirement for producing professional-looking videos. Don’t let concerns about equipment hold you back. Start with the basics and gradually upgrade your tools as you gain experience and confidence in creating instructional videos.
- Aiming for Perfection: Perfection can be an obstacle to the creative process, causing delays or hindering progress. The primary goal of instructional videos is to teach, not to create flawless videos. Focus on delivering valuable content rather than seeking perfection.
FAQs
How do I set a fair price for my online course video?
Use the “Similar Outcome Approach” by considering the ideal outcome of your course, assessing the costs of alternative methods to achieve the same results, and contemplating the cost of doing nothing for your students. Once you’ve gathered this information, position your course within an appropriate price range.
What presentation techniques should I use for my online course video?
Implement personalization principles by using a conversational style, engaging on-screen coaches, and making the instructor visible. Consider team teaching to enhance interactivity. Apply multimedia principles by using visuals such as graphics, charts, or animations, and present words as audio narration instead of on-screen text.
How to create an online course to sell?
The process of creating a course to sell involves developing an online course that targets a specific audience, offers valuable content, and is hosted on a suitable and secure video hosting platform for easy access, faster delivery, and integration.
Supercharge Your Business with Videos
At VdoCipher we maintain the strongest content protection for videos. We also deliver the best viewer experience with brand friendly customisations. We'd love to hear from you, and help boost your video streaming business.



Leave a Reply