

Read this step by step guide to embed VdoCipher video in Wix website. If you paste VdoCipher’s embed code into Wix HTML box, It will give error. This guide fixes that. You don’t need to know how to code – you’re copying and pasting one file.
Table of Contents
- Watch the tutorial video
- Requirements
- Why the normal HTML embed doesn’t work
- Step-by-step guide
- Step 1: Generate your embed code in VdoCipher
- Step 2: Turn on Dev Mode in the Wix Editor
- Step 3: Add the Custom Element
- Step 4: Create a new JS file
- Step 5: Paste the code into the velo file
- Step 6: Paste the OTP and playbackInfo
- Step 7: Point it at the velo file
- Step 8: Set the tag name
- Step 9: Publish and open the live site
- About the names
- Worth knowing
Watch the tutorial Video
The whole setup, start to finish. If you’d rather read, the written steps below cover exactly the same ground.
Requirements:
- A paid Wix plan. Any Premium plan. Free sites can’t do this.
- Custom domain, connected to the site. Not the free yoursite.wixsite.com address. A subdomain of a domain you already own is fine.
These are Wix’s rules, not VdoCipher’s. Wix requires them for the feature we’re about to use.
Why the normal HTML embed doesn’t work
Your videos are protected by DRM. For DRM to work, the browser has to be given explicit permission to decrypt the video. That permission lives in one small piece of the embed code:
allow="encrypted-media"
Wix deletes that piece automatically when you paste the embed into its HTML box and save it.
To fix this, Wix has a feature for this called a Custom Element and dev mode.
Step-by-step Guide
Step 1: Generate your embed code in VdoCipher Dashboard
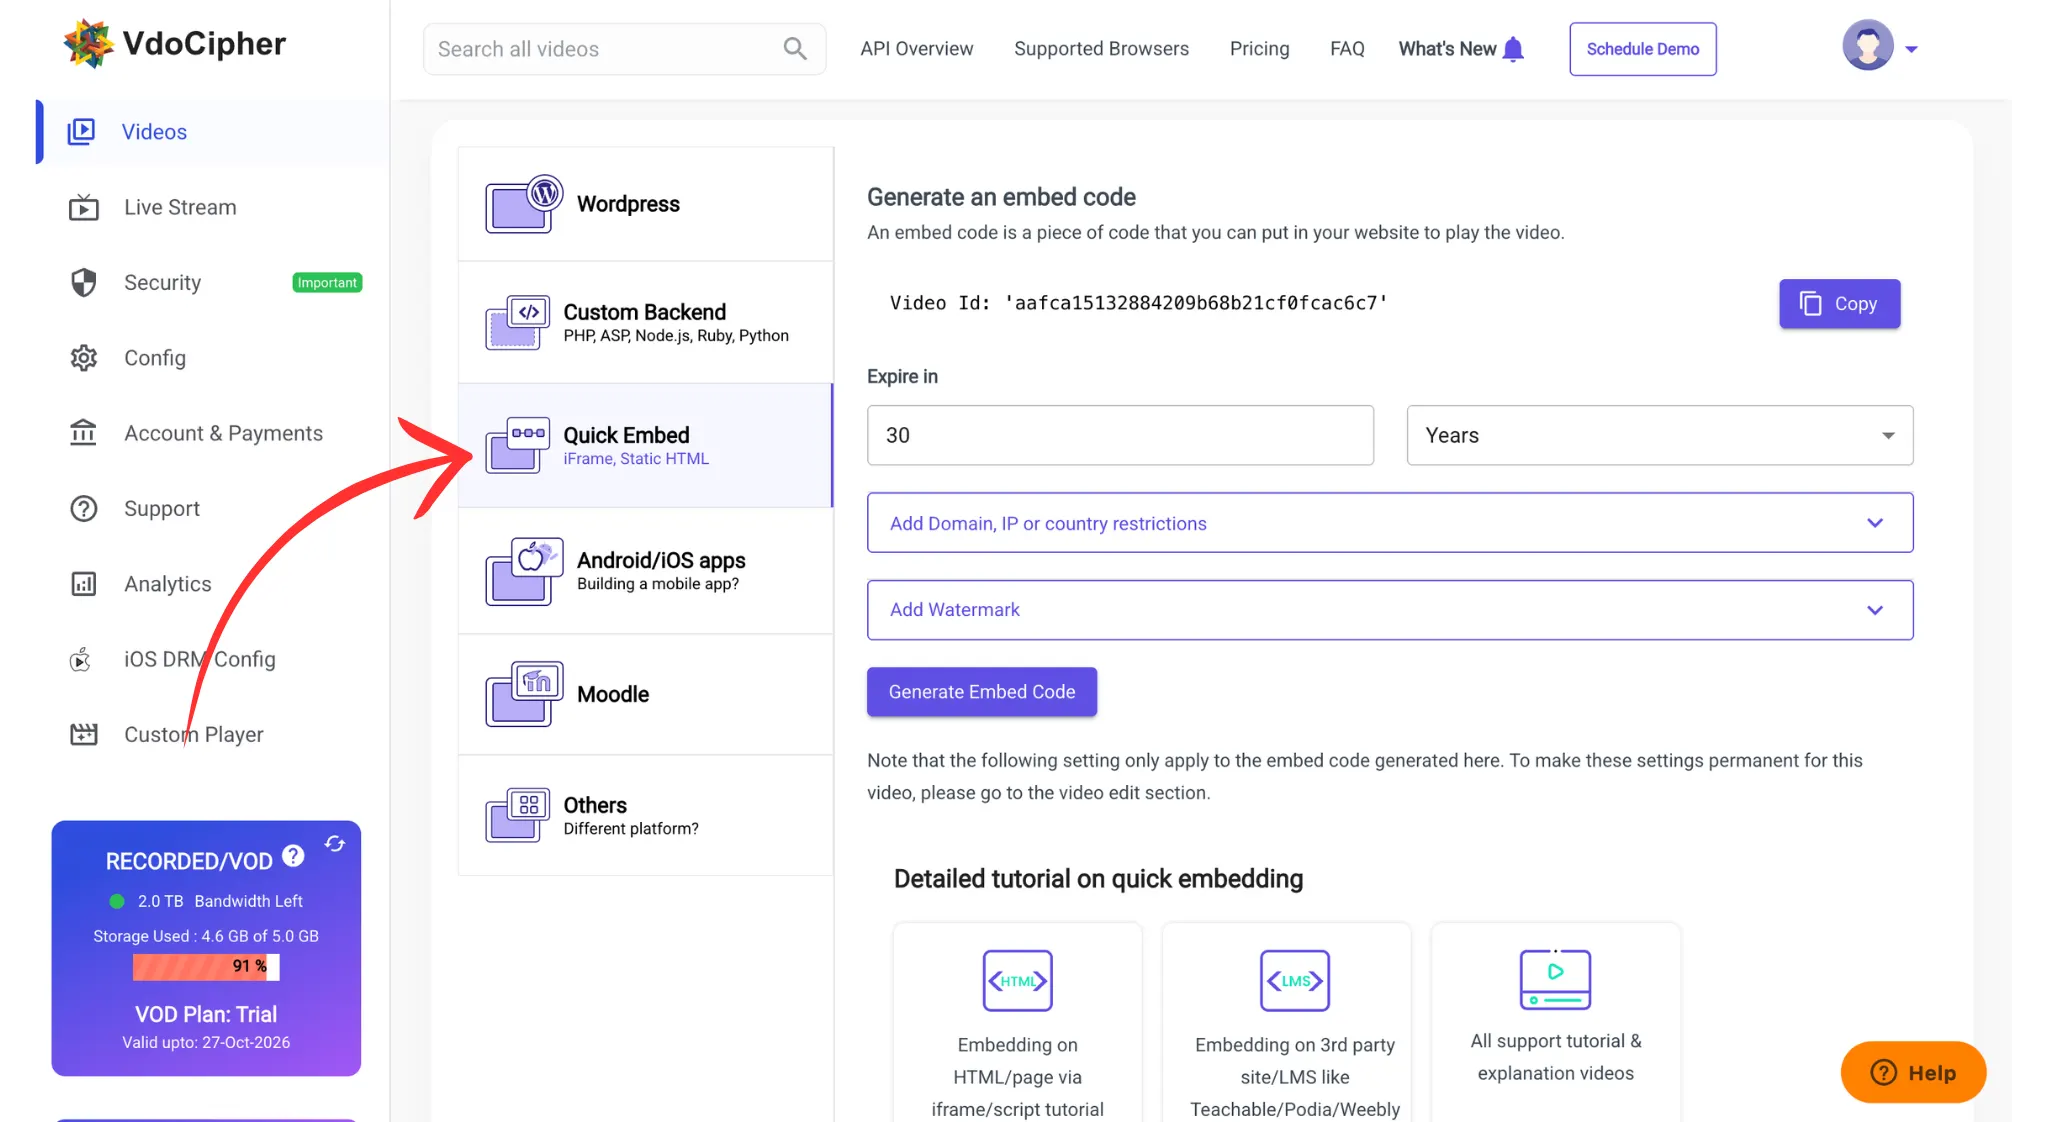
Log in to your VdoCipher dashboard and open your video library. Pick the video you want to embed, generate the embed code.
You’ll get a block of code starting with <iframe. Paste it somewhere safe for now like google docs or notes app. You’ll pull two values out of it later.
Step 2: Go to Wix Editor and Turn on Dev Mode
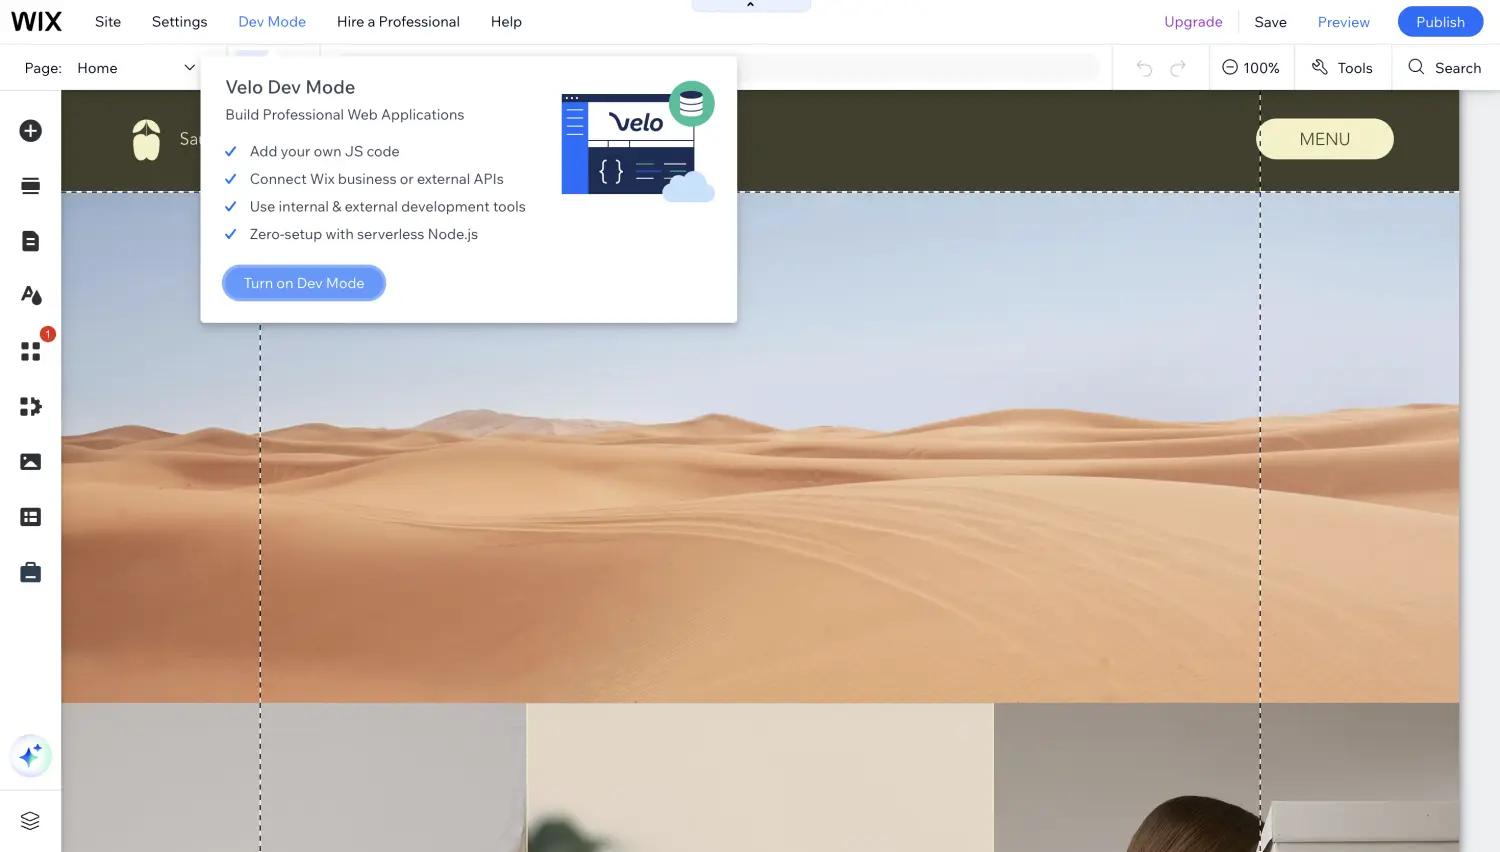
Open your site in the Wix Editor. In the top menu, click Dev Mode, then Turn on Dev Mode.
Step 3: Add the Custom Element
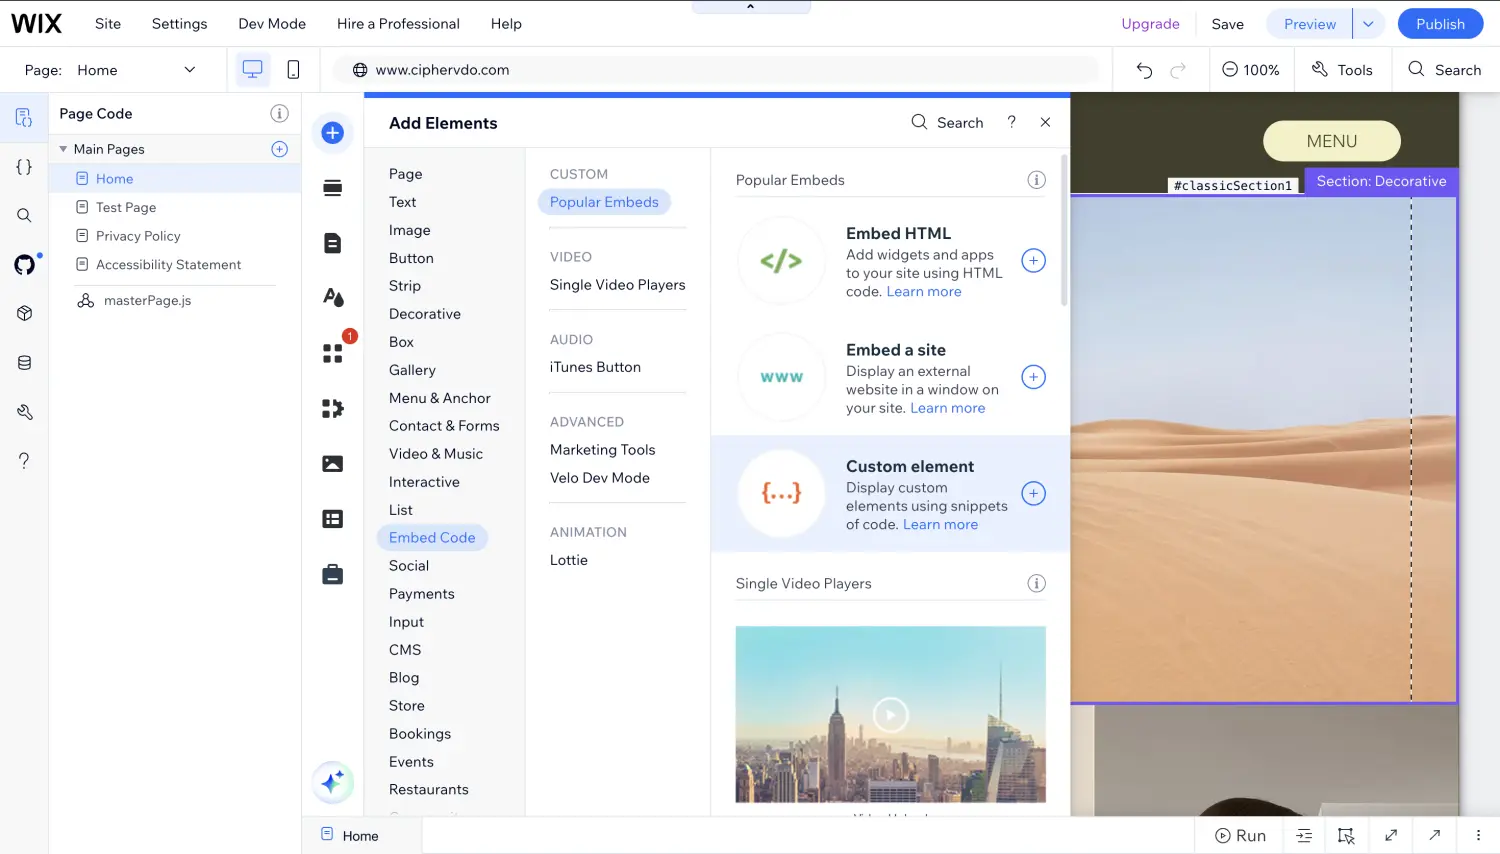
In the left sidebar click Add Elements → then Embed Code → then Custom element. Drag it onto the page where you want the video. Adjust the element size to fit your design
Step 4: Create new js file
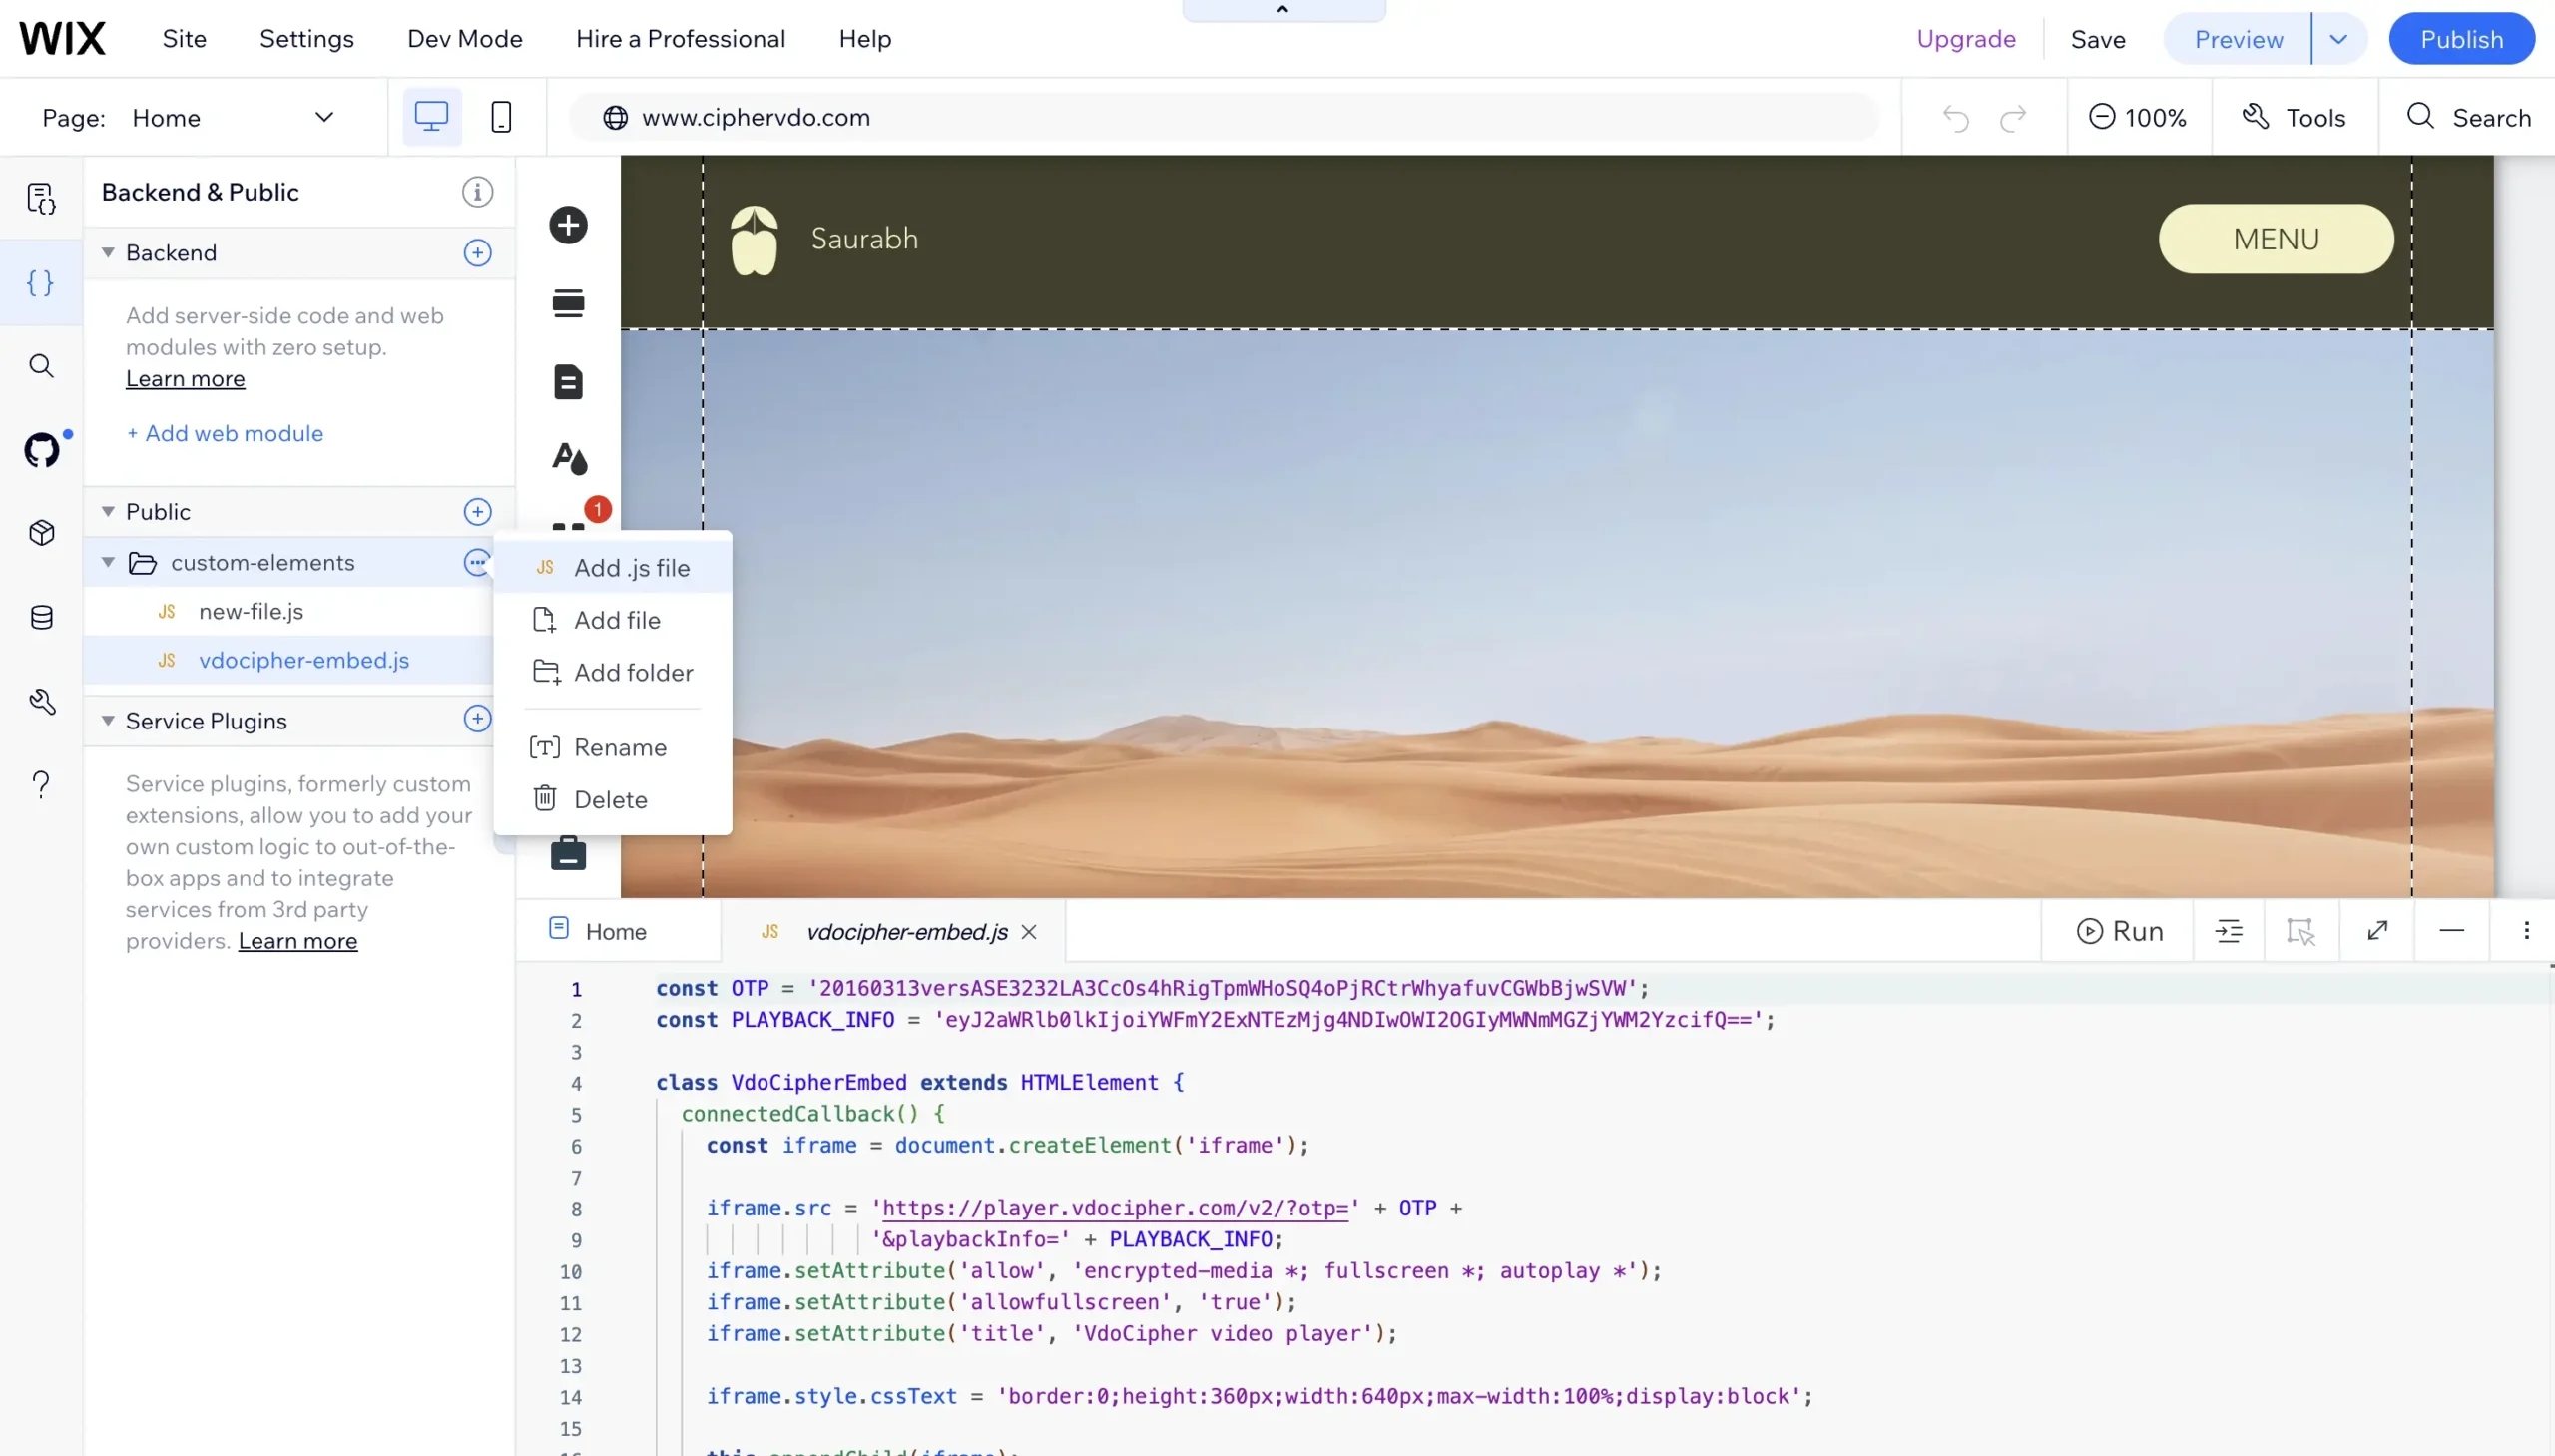
In the new sidebar, Click “Backend & Public” open the Public folder, then the custom-elements folder inside it. Add a new file there and name it vdocipher-embed.js.
The folder matters. If the file isn’t in public/custom-elements/, Wix won’t offer it to you later and you’ll be stuck at step 6.
Step 5: Paste this code into the velo file
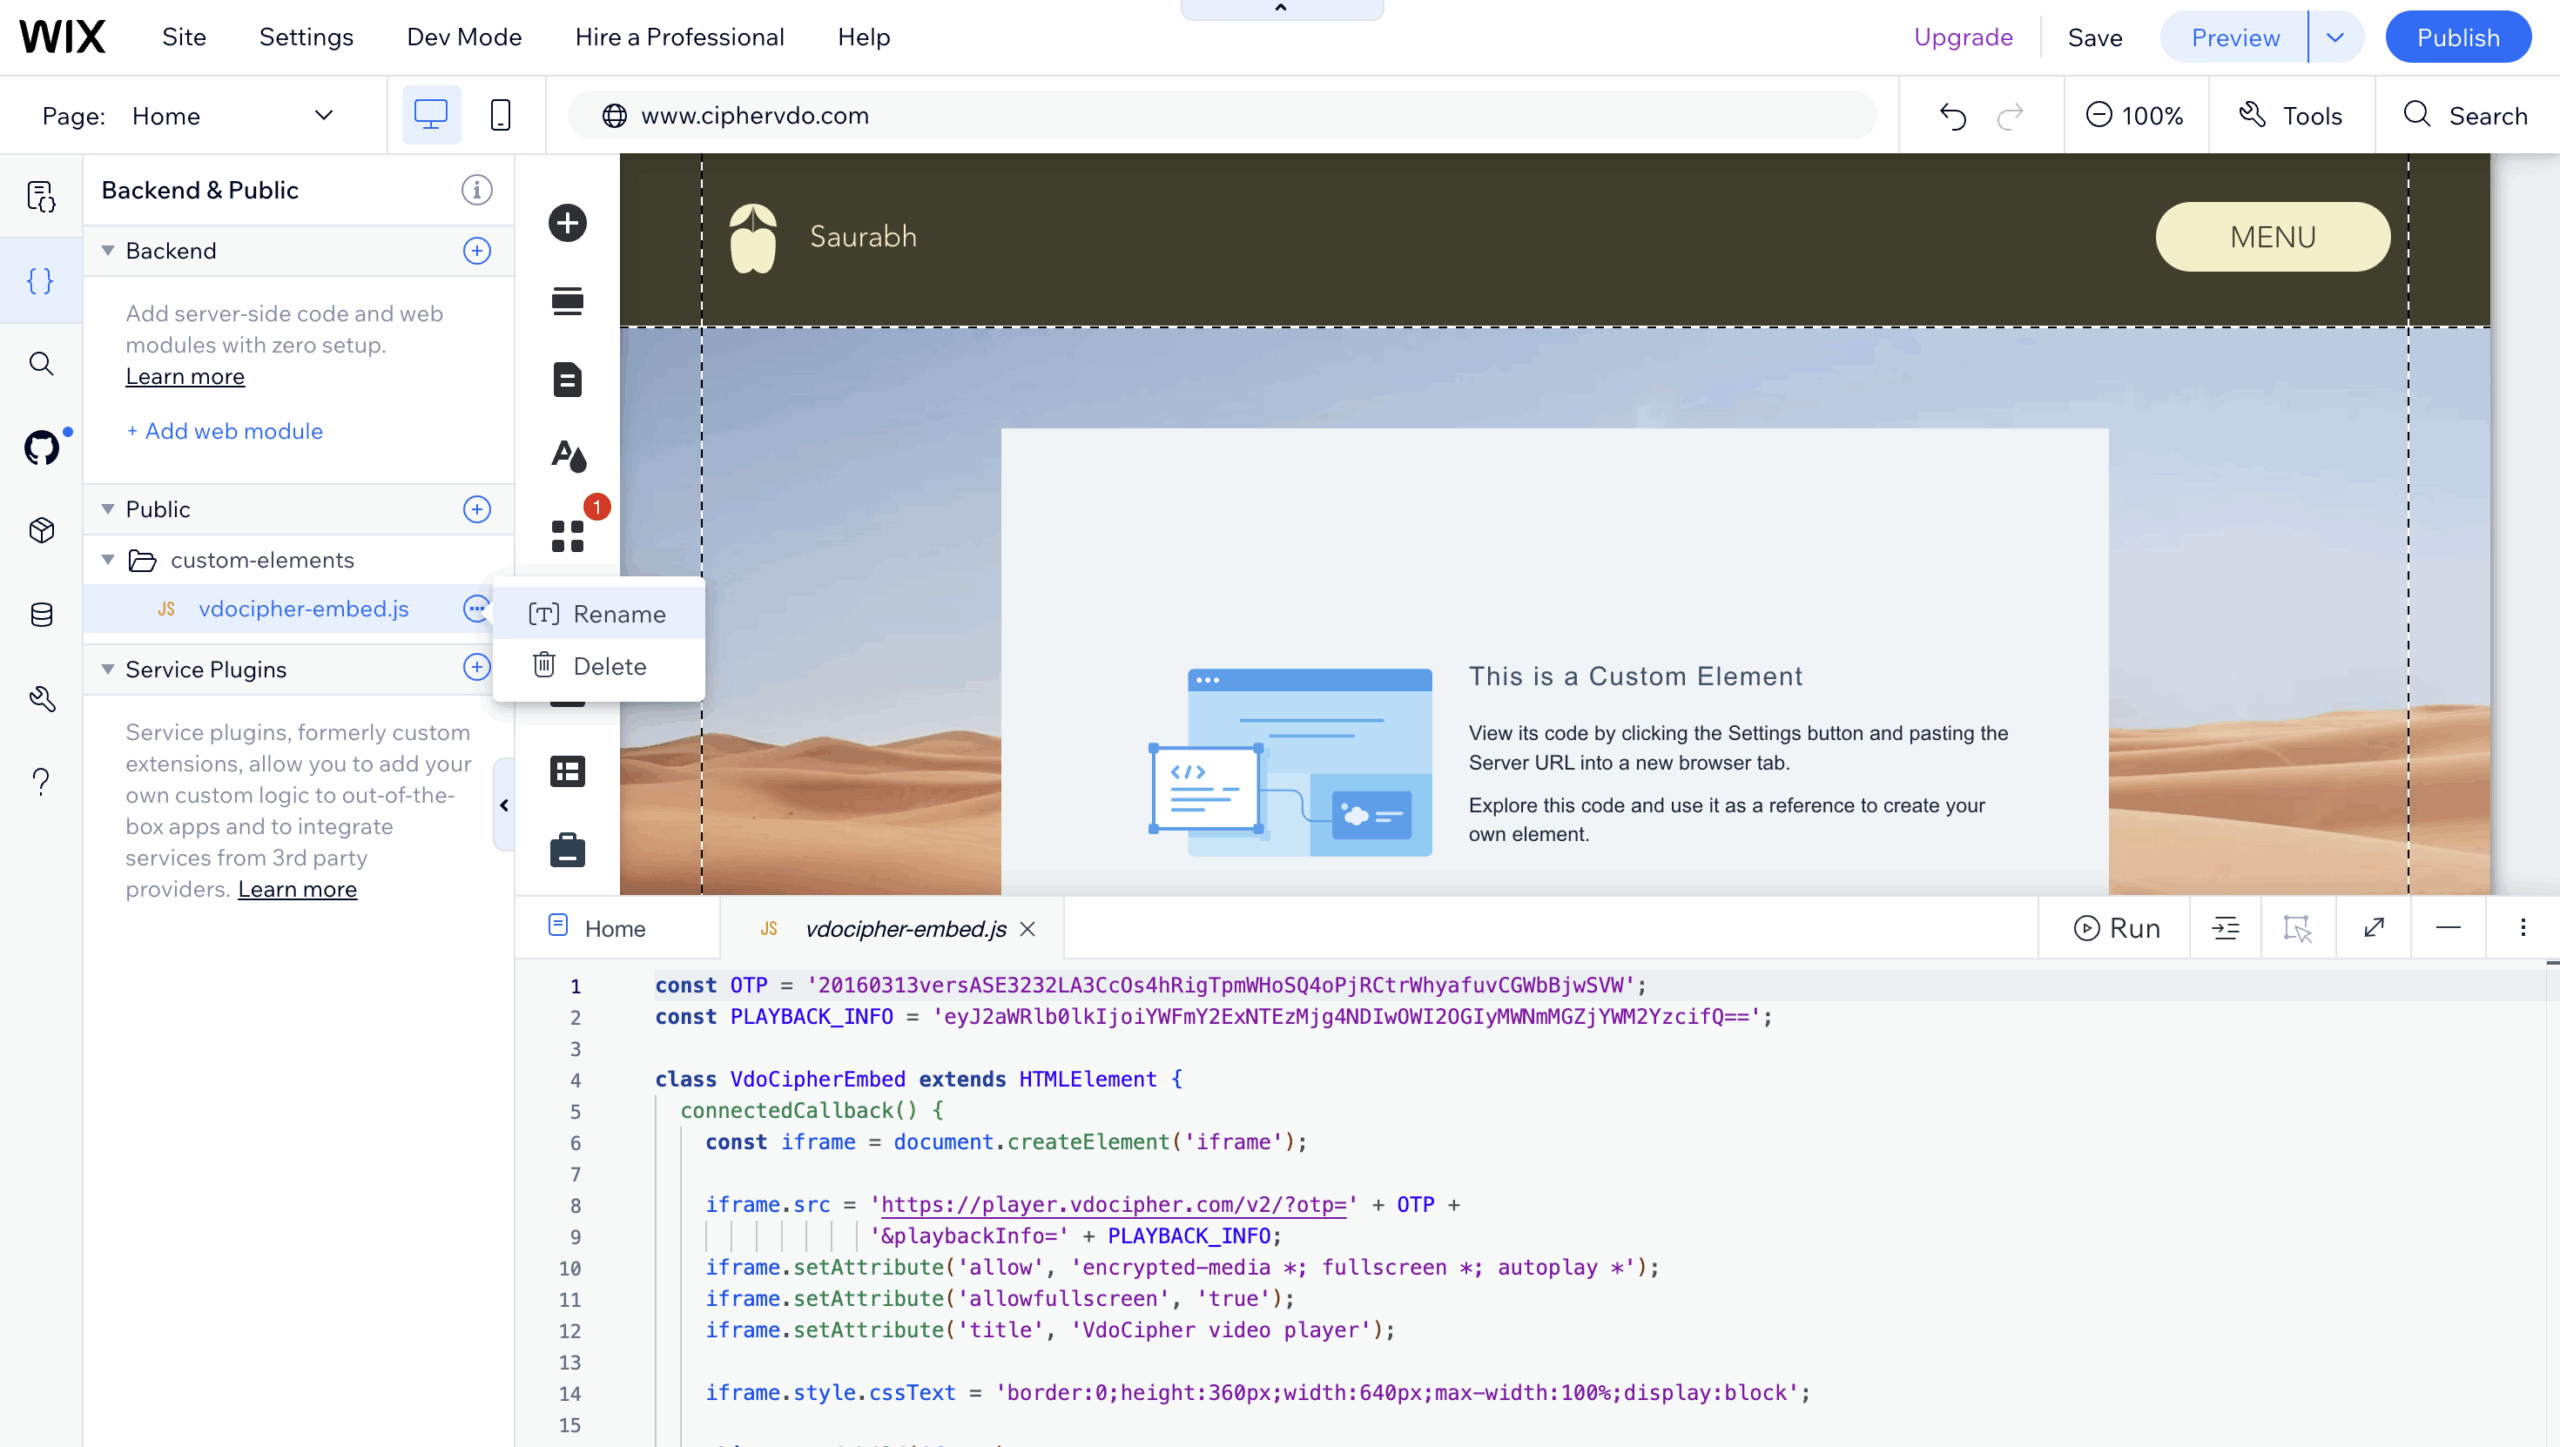
Delete anything already in the file first, then paste this in. You’ll replace the two values at the top in a moment.
const OTP = 'PASTE_YOUR_OTP_HERE';
const PLAYBACK_INFO = 'PASTE_YOUR_PLAYBACK_INFO_HERE';

class VdoCipherEmbed extends HTMLElement {
  connectedCallback() {
    const iframe = document.createElement('iframe');

    iframe.src = 'https://player.vdocipher.com/v2/?otp=' + OTP +
                 '&playbackInfo=' + PLAYBACK_INFO;

    // This line is the whole point. Wix never sees it, so it can't delete it.
    iframe.setAttribute('allow', 'encrypted-media *; fullscreen *; autoplay *');
    iframe.setAttribute('allowfullscreen', 'true');
    iframe.setAttribute('title', 'VdoCipher video player');

    iframe.style.cssText =
      'border:0;height:360px;width:640px;max-width:100%;display:block';

    this.appendChild(iframe);
  }
}

if (!customElements.get('vdocipher-embed')) {
  customElements.define('vdocipher-embed', VdoCipherEmbed);
}
That’s the trick, in one line: we build the video player with code instead of pasting it as text. Wix only strips the permission out of pasted text. It never inspects what the code builds.
step 6: Paste the OTP and playbackInfo in the code
Now you need your OTP and your playbackInfo. Both are already sitting in the embed code VdoCipher gave you. Here’s a sample embed:
<iframe src="https://player.vdocipher.com/v2/?otp=20160313versASE3232a3Osr5dPG6L7FPaZQ2H1IDxC3bxKa19Nb8sOYeKtPTGLT&playbackInfo=eyJ2aWRlb0lkIjoiYWFmY2ExNTEzMjg4NDIwOWI2OGIyMWNmMGZjYWM2YzcifQ==" style="border:0;height:360px;width:640px;max-width:100%" allowFullScreen="true" allow="encrypted-media"></iframe>
Two chunks. That’s all you need from it.
- The OTP is everything between
otp=and&playbackInfo= - The playbackInfo is everything between
playbackInfo=and the closing quote mark. Include the==at the end.
Drop those two values into the top of your file. For the sample embed above, the finished file looks exactly like this:
const OTP = '20160313versASE3232a3Osr5dPG6L7FPaZQ2H1IDxC3bxKa19Nb8sOYeKtPTGLT';
const PLAYBACK_INFO = 'eyJ2aWRlb0lkIjoiYWFmY2ExNTEzMjg4NDIwOWI2OGIyMWNmMGZjYWM2YzcifQ==';

class VdoCipherEmbed extends HTMLElement {
  connectedCallback() {
    const iframe = document.createElement('iframe');

    iframe.src = 'https://player.vdocipher.com/v2/?otp=' + OTP +
                 '&playbackInfo=' + PLAYBACK_INFO;

    iframe.setAttribute('allow', 'encrypted-media *; fullscreen *; autoplay *');
    iframe.setAttribute('allowfullscreen', 'true');
    iframe.setAttribute('title', 'VdoCipher video player');

    iframe.style.cssText =
      'border:0;height:360px;width:640px;max-width:100%;display:block';

    this.appendChild(iframe);
  }
}

if (!customElements.get('vdocipher-embed')) {
  customElements.define('vdocipher-embed', VdoCipherEmbed);
}
Step 7: Point it at velo file
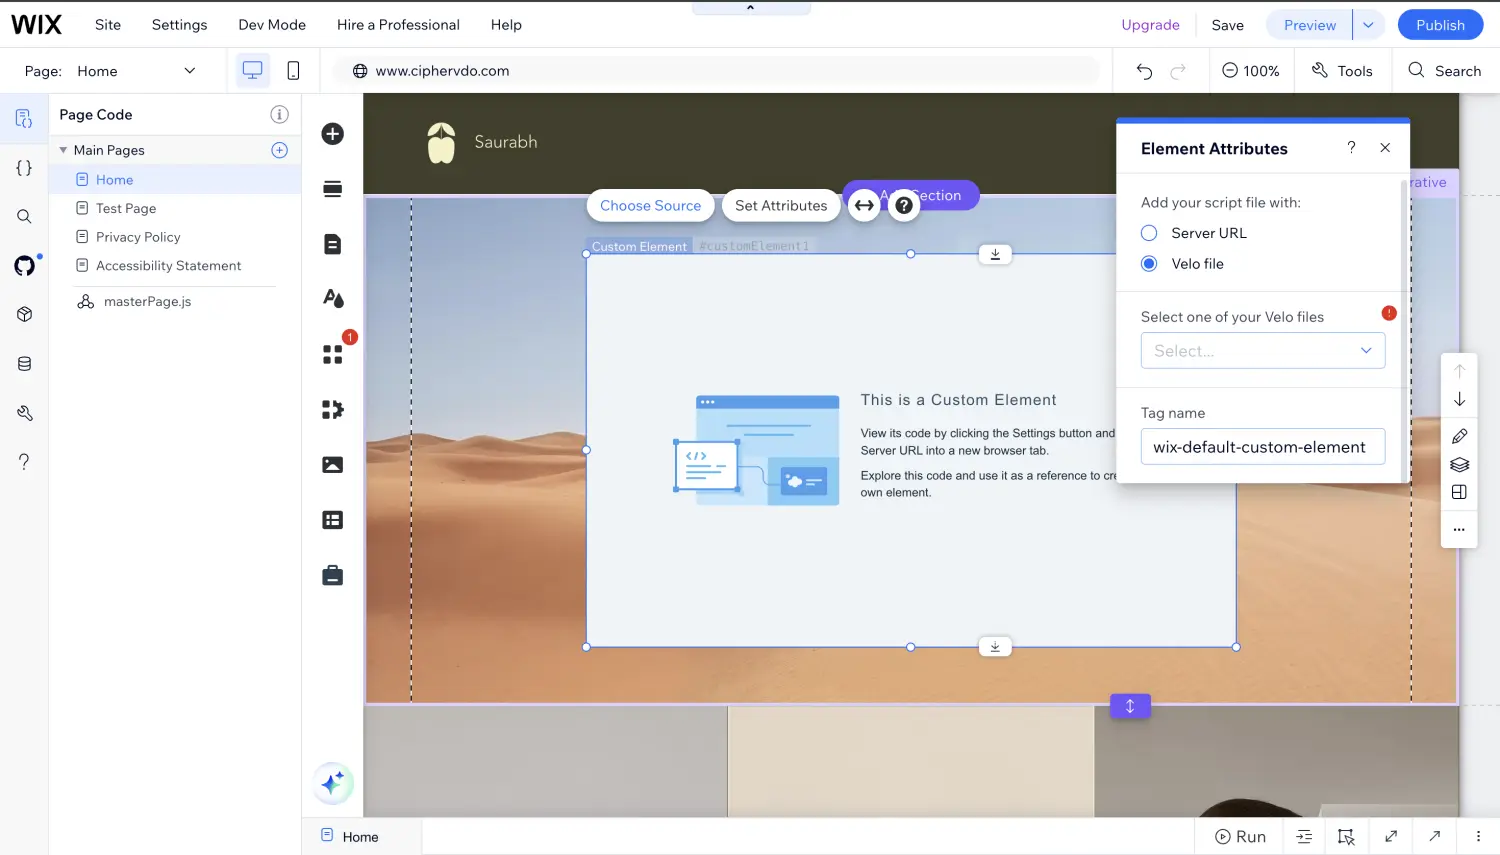
Click the custom element, then Choose Source. Pick Velo file, and select vdocipher-embed.js from the dropdown.
Step 8: Set the tag name
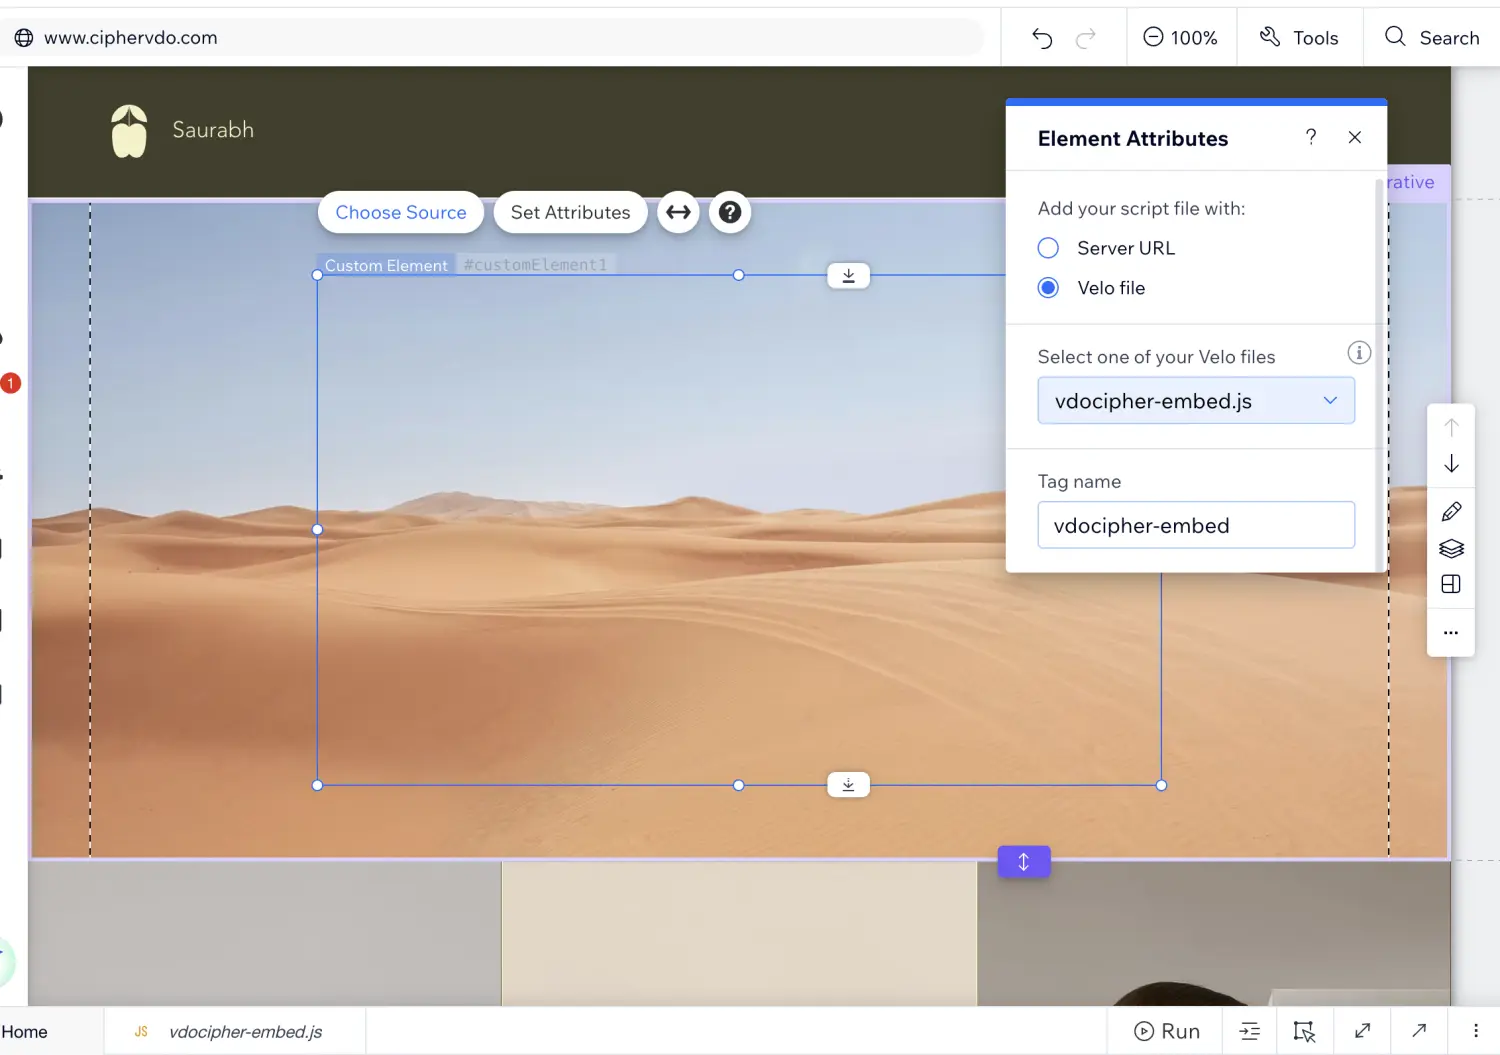
In the same panel, clear the Tag name box and type:
vdocipher-embed
This has to match the name in the last line of your code exactly. One wrong character and nothing shows up.
Step 9: Publish, then open the live site
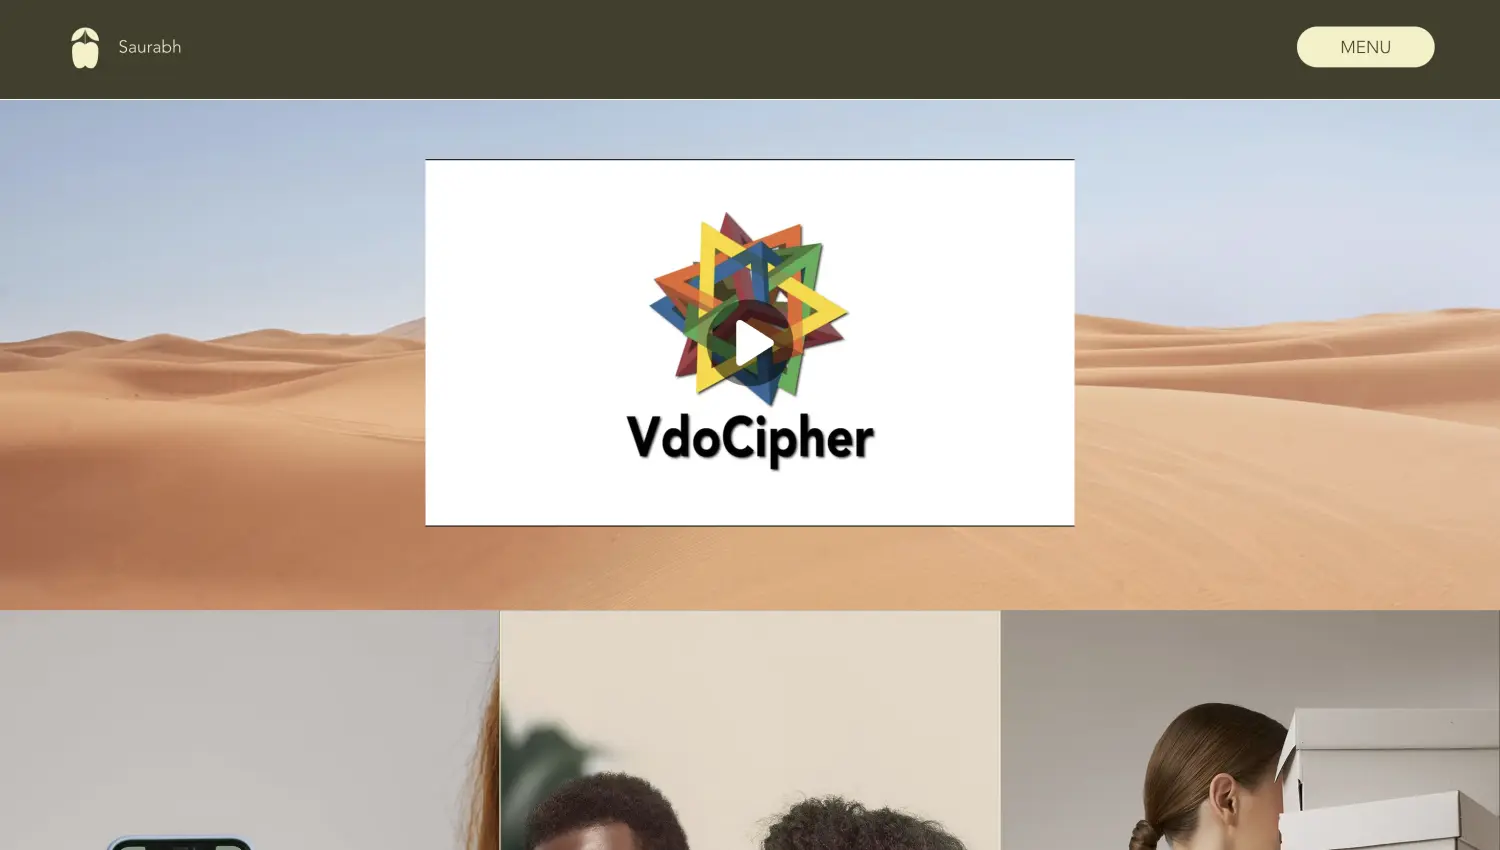
Click Publish, then visit your actual site address.
Wix Preview will not show it. Only the published site will have the embedded video. If you have any question or need tech support send us an email at support@vdocipher.com
Information about the File Names
Three names come up in this guide, and only two of them have to match.
| Name | Example | Rule |
|---|---|---|
| The file name | vdocipher-embed.js | Call it whatever you like. |
| Tag name in the editor | vdocipher-embed | Must match the name in your code. |
| Name inside customElements.define() | vdocipher-embed | Must match the tag name in the editor. |
One rule that isn’t optional: the tag name must contain a hyphen. vdocipher-embed works. vdocipherembed does not, and it fails without telling you why.
Easiest approach: use the same name in all three places, like this guide does. Then there’s nothing to get wrong.
Clarification:-
- This is a Wix limitation, not VdoCipher. The same workaround applies to any DRM video player on Wix.
- The Custom Element only appears on the published site. It won’t render in the editor, so don’t panic when the box looks empty while you’re working.
- To add a second video, repeat the whole thing with a different file name and a different tag name – for example
vdocipher-embed-two. - On other platforms this is much simpler. See our guides to embedding videos in WordPress and video embedding in general.
DRM video hosting for Wix websites
We host video with Widevine and FairPlay DRM and dynamic watermarking, so your video can not be downloaded. It works on Wix, Teachable, WordPress, and most site builders. Secure your course from piracy.


Leading Growth at VdoCipher. I love building connections that help businesses grow and protect their revenue. Outside of work, I’m always exploring new technology and startups.
Leave a Reply